Robot tutorial
In this tutorial we will build a simple robot language to demonstrate the basic workflow when working with textX.
Robot language
When building a DSL we should first do a domain analysis, to see what concepts do we have and what are their relationships and constraints. In the following paragraph a short analysis is done. Important concepts are emphasized.
In this case we want an imperative language that should define robot movement
on the imaginary grid. Robot should move in four base direction. We will
call these directions up, down, left and right (you could use north, south,
west and east if you like). Additionally, we shall have a robot coordinate given
in x, y position. For simplicity, our robot can move in discrete steps. In
each movement robot can move by 1 or more steps but in the same direction.
Coordinate is given as a pair of integer numbers. Robot will have an initial position. If not given explicitly it is assumed that position is (0, 0).
So, lets build a simple robot language.
Grammar
First, we need to define a grammar for the language. In textX the grammar will also define a meta-model (a.k.a. abstract syntax) for the language which can be visualized and be used as a part of the documentation.
Usually we start by outlining some program in the language we are building.
Here is an example program on robot language:
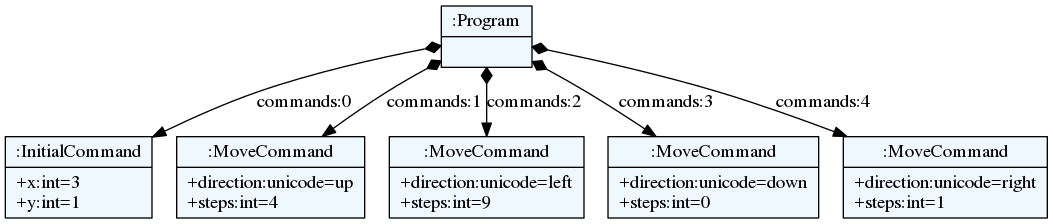
begin
    initial 3, 1
    up 4
    left 9
    down
    right 1
end
We have begin and end keywords that define the beginning and end of the
program. In this case we could do without these keywords but lets have it to
make it more interesting.
In between those two keywords we have a sequence of instruction. First
instruction will position our robot at coordinate (3, 1). After that robot
will move up 4 steps, left 9 steps, down 1 step (1 step is the default)
and finally 1 step to the right.
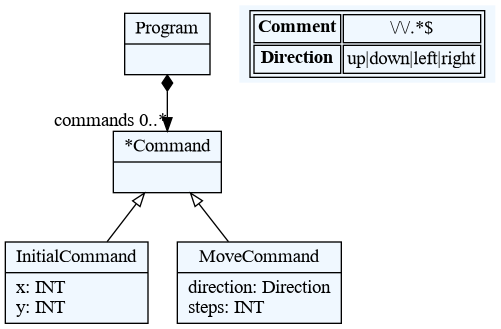
Lets start with grammar definition. We shall start in a top-down manner so lets first define a program as a whole.
Program:
  'begin'
    commands*=Command
  'end'
;
Here we see that our program is defined with sequence of:
- string match (
'begin'), - zero or more assignment to
commandsattribute, - string match (
'end').
String matches will require literal strings given at the begin and end of
program. If this is not satisfied a syntax error will be raised. This whole rule
(Program) will create a class with the same name in the meta-model. Each
program will be an instance of this class. commands assignment will result in
a python attribute commands on the instance of Program class. This attribute
will be of Python list type (because *= assignment is used). Each element
of this list will be a specific command.
Now, we see that we have different types of commands. First command has two parameters and it defines the robot initial position. Other commands has one or zero parameters and define the robot movement.
To state that some textX rule is specialised in 2 or more rules we use an
abstract rule. For Command we shall define two specializations:
InitialCommand and MoveCommand like this:
Command:
  InitialCommand | MoveCommand
;
Abstract rule is given as ordered choice of other rules. This can be read as Each command is either a InitialCommand or MoveCommand.
Lets now define command for setting initial position.
InitialCommand:
  'initial' x=INT ',' y=INT
;
This rule specifies a class InitialCommand in the meta-model. Each initial
position command will be an instance of this class.
So, this command should start with the keyword initial after which we give an
integer number (base type rule INT - this number will be available as
attribute x on the InitialCommand instance), than a separator , is
required after which we have y coordinate as integer number (this will be
available as attribute y). Using base type rule INT matched number from
input string will be automatically converted to python type int.
Now, lets define a movement command. We know that this command consists of direction identifier and optional number of steps (if not given the default will be 1).
MoveCommand:
  direction=Direction (steps=INT)?
;
So, the movement command model object will have two attributes.
direction attribute will define one of the four possible directions and
steps attribute will be an integer that will hold how many steps a robot
will move in given direction. Steps are optional so if not given in the program
it will still be a correct syntax. Notice, that the default of 1 is not
specified in the grammar. The grammar deals with syntax constraints. Additional
semantics will be handled later in model/object processors (see below).
Now, the missing part is Direction rule referenced from the previous rule.
This rule will define what can be written as a direction. We will define this
rule like this:
Direction:
  "up"|"down"|"left"|"right"
;
This kind of rule is called a match rule. This rule does not result in a new object. It consists of ordered choice of simple matches (string, regex), base type rules (INT, STRING, BOOL...) and/or other match rule references.
The result of this match will be assigned to the attribute from which it was referenced. If base type was used it will be converted in a proper python type. If not, it will be a python string that will contain the text that was matched from the input.
In this case a one of 4 words will be matched and that string will be assigned
to the direction attribute of the MoveCommand instance.
The final touch to the grammar is a definition of the comment rule. We want to comment our robot code, right?
In textX a special rule called Comment is used for that purpose.
Lets define a C-style single line comments.
Comment:
  /\/\/.*$/
;
Our grammar is done. Save it in robot.tx file. The content of this file
should now be:
Program:
  'begin'
    commands*=Command
  'end'
;

Command:
  InitialCommand | MoveCommand
;

InitialCommand:
  'initial' x=INT ',' y=INT
;

MoveCommand:
  direction=Direction (steps=INT)?
;

Direction:
  "up"|"down"|"left"|"right"
;

Comment:
  /\/\/.*$/
;
Notice that we have not constrained initial position command to be specified just once on the beginning of the program. This basically means that this command can be given multiple times throughout the program. I will leave as an exercise to the reader to implement this constraint.
Next step during language design is meta-model visualization. It is usually easier to comprehend our language if rendered graphically. To do so we use excellent GraphViz software package and its DSL for graph specification called dot. It is a textual language for visual graph definition.
Lets check our meta-model and export it to the dot language.
$ textx generate robot.tx --target dot
Generating dot target from models:
/home/igor/repos/textX/textX/examples/robot/robot.tx
-> /home/igor/repos/textX/textX/examples/robot/robot.dot
  To convert to png run "dot -Tpng -O robot.dot"
dot file can be opened with dot viewer (there are many to choose from) or
transformed with dot tool to raster or vector graphics.
For example:
$ dot -Tpng -O robot.dot
This command will create png image out of dot file.
Instantiating meta-model
In order to parse our models we first need to construct a meta-model. A textX meta-model is a Python object that contains all classes that can be instantiated in our model. For each grammar rule a class is created. Additionally, meta-model contains a parser that knows how to parse input strings. From parsed input (parse tree) meta-model will create a model.
Meta-models are created from our grammar description, in this case
robot.tx file. Open robot.py Python file and write following:
from textx import metamodel_from_file
robot_mm = metamodel_from_file('robot.tx')
Instantiating model
Now, when we have our meta-model we can parse models from strings or external
textual files. Extend your robot.py with:
robot_model = robot_mm.model_from_file('program.rbt')
This command will parse the file program.rbt and construct our robot model.
If this file does not match our language a syntax error will be raised on the
first error encountered.
In the same manner as meta-model visualization we can visualize our model too.
$ textx generate program.rbt --grammar robot.tx --target dot
Generating dot target from models:
/home/igor/repos/textX/textX/examples/robot/program.rbt
-> /home/igor/repos/textX/textX/examples/robot/program.dot
  To convert to png run "dot -Tpng -O program.dot"
This will create program.dot file that can be visualized using proper viewer
or transformed to image.
$ dot -Tpng -O program.dot
For the robot program above we should get an image like this:
Interpreting model
When we have successfully parsed and loaded our model/program (or mogram or prodel ;) ) we can do various stuff. Usually what would you like to do is to translate your program to some other language (Java, Python, C#, Ruby,...) or you could build an interpreter that will evaluate/interpret your model directly. Or you could analyse your model, extract informations from it etc. It is up to you to decide.
We will show here how to build a simple interpreter that will start the robot from the initial position and print the position of the robot after each command.
Lets imagine that we have a robot that understands our language. In your
robot.py file add:
class Robot:

    def __init__(self):
        # Initial position is (0,0)
        self.x = 0
        self.y = 0

    def __str__(self):
        return f"Robot position is {self.x}, {self.y}."
Now, our robot will have an interpret method that accepts our robot model and
runs it. At each step this method will update the robot position and print it.
def interpret(self, model):

    # model is an instance of Program
    for c in model.commands:

        if c.__class__.__name__ == "InitialCommand":
            print(f"Setting position to: {c.x}, {c.y}")
            self.x = c.x
            self.y = c.y
        else:
            print(f"Going {c.direction} for {c.steps} step(s).")

            move = {
                "up": (0, 1),
                "down": (0, -1),
                "left": (-1, 0),
                "right": (1, 0)
            }[c.direction]

            # Calculate new robot position
            self.x += c.steps * move[0]
            self.y += c.steps * move[1]

        print(self)
Now lets give our robot_model to Robot instance and see what happens.
robot = Robot()
robot.interpret(robot_model)
You should get this output:
Setting position to: 3, 1
Robot position is 3, 1.
Going up for 4 step(s).
Robot position is 3, 5.
Going left for 9 step(s).
Robot position is -6, 5.
Going down for 0 step(s).
Robot position is -6, 5.
Going right for 1 step(s).
Robot position is -5, 5.
It is almost correct. We can see that down movement is for 0 steps because we
have not defined the steps for down command and haven't done anything yet to
implement default of 1.
The best way to implement default value for step is to use so called object
processor for MoveCommand.
Object processor is a callable that gets called whenever textX parses and
instantiates an object of particular class. Use register_obj_processors
method on meta-model to register callables/processors for classes your wish to
process in some way immediately after instantiation.
Lets define our processor for MoveCommand in robot.py file.
def move_command_processor(move_cmd):

  # If steps is not given, set it do default 1 value.
  if move_cmd.steps == 0:
    move_cmd.steps = 1
Now, register this processor on meta-model. After meta-model construction add a line for registration.
robot_mm.register_obj_processors({'MoveCommand': move_command_processor})
register_obj_processors accepts a dictionary keyed by class name. The
values are callables that should handle instances of the given class.
If you run robot interpreter again you will get output like this:
Setting position to: 3, 1
Robot position is 3, 1.
Going up for 4 step(s).
Robot position is 3, 5.
Going left for 9 step(s).
Robot position is -6, 5.
Going down for 1 step(s).
Robot position is -6, 4.
Going right for 1 step(s).
Robot position is -5, 4.
And now our robot behaves as expected!
The code from this tutorial can be found in the examples/robot folder.
Next, you can read the Entity tutorial where you can see how to generate source code from your models.