![]()
textX is a meta-language (i.e. a language for language definition) for domain-specific language (DSL) specification in Python.
In a nutshell, textX will help you build your textual language in an easy way. You can invent your own language or build a support for an already existing textual language or file format.
From a single grammar description, textX automatically builds a meta-model (in the form of Python classes) and a parser for your language. The parser will parse expressions of your language and automatically build a graph of Python objects (i.e. the model) corresponding to the meta-model.
textX is inspired by Xtext - a Java based language workbench for building DSLs with full tooling support (editors, debuggers etc.) on the Eclipse platform. If you like Java and Eclipse check it out. It is a great tool.
A video tutorial for textX installation and implementation of a simple data modeling language is below.
For a not-so-basic video tutorial check out State Machine video tutorial.
For an introduction to DSLs in general here are some references:
- Federico Tomassetti: The complete guide to (external) Domain Specific Languages.
- Pierre Bayerl: self-dsl.
For an in-depth coverage on the subject we recommend the following books:
- Voelter, Markus, et al. DSL engineering: Designing, implementing and using domain-specific languages. dslbook.org, 2013.
- Kelly, Steven, and Juha-Pekka Tolvanen. Domain-specific modeling: enabling full code generation. John Wiley & Sons, 2008.
Feature highlights
-
Meta-model/parser from a single description
A single description is used to define both language concrete syntax and its meta-model (a.k.a. abstract syntax). See the description of grammar and metamodel.
-
Automatic model (AST) construction
Parse tree will automatically be transformed to a graph of python objects (a.k.a. the model). See the model section.
Python classes will be created by textX but, if needed, user supplied classes may be used. See custom classes.
-
Automatic linking
You can have references to other objects in your language and the textual representation of the reference will be resolved to the proper python reference automatically.
-
Automatic parent-child relationships
textX will maintain a parent-child relationships imposed by the grammar. See parent-child relationships.
-
Parser control
Parser can be configured with regard to case handling, whitespace handling, keyword handling etc. See parser configuration.
-
Model/object post-processing
A callbacks (so called processors) can be registered for models and individual classes. This enables model/object postprocessing (validation, additional changes etc.). See processors section.
-
Grammar modularization - imports
Grammar can be split into multiple files and then files/grammars can be imported where needed. See Grammar modularization.
-
Scope Providers
Scope Providers allow different types of scoping. See Scoping.
-
Multi-meta-model support
Different meta-models can be combined. Typically some of these meta-models extend other meta-models (grammar modularization) and reference each other. Special scope providers support file-extension-based allocation of model files to meta models. See Multi meta-model support
-
Meta-model/model visualization
Both meta-model and parsed models can be visulized using GraphViz software package. See visualization section.
Installation
$ pip install textX[cli]
Previous command requires pip to be installed.
Also, notice the use of [cli] which means that we would like to use CLI
textx command. If you just want to deploy your language most probably you
won't need CLI support.
To verify that textX is properly installed run:
$ textx
You should get output like this:
Usage: textx [OPTIONS] COMMAND [ARGS]...

Options:
  --debug  Debug/trace output.
  --help   Show this message and exit.

Commands:
  check            Check/validate model given its file path.
  generate         Run code generator on a provided model(s).
  list-generators  List all registered generators
  list-languages   List all registered languages
  version          Print version info.
To install development (master branch) version:
$ pip install --upgrade https://github.com/textX/textX/archive/master.zip
Python versions
textX works with Python 3.8+. Other versions might work but are not tested.
Getting started
See textX Tutorials to get you started:
- Hello World
- Robot
- Entity
- State Machine - video tutorial
- Toy language compiler
- self-dsl
For specific information read various User Guide sections.
You can also try textX in our playground. There is a dropdown with several examples to get you started.
A full example project that shows how multi-meta-modeling feature can be used is also available in a separate git repository.
To create the initial layout of your project quickly take a look at project scaffolding.
Discussion and help
For general questions and help please use
StackOverflow. Just make
sure to tag your question with the textx tag.
For issues, suggestions and feature request please use GitHub issue tracker.
Projects using textX
Here is a non-complete list of projects using textX.
-
Open-source
- pyecore - ECore implementation in Python. Vincent Aranega is doing a great work on integrating textX with pyecore. The idea is that the integration eventually gets merged to the main textX repo. For now, you can follow his work on his fork of textX.
- pyTabs - A Domain-Specific Language (DSL) for simplified music notation
- applang - Textual DSL for generating mobile applications
- pyFlies - A DSL for designing experiments in psychology
- ppci - Pure python compiler infrastructure.
- Expremigen - Expressive midi generation
- fanalyse - Fortran code parser/analyser
- Silvera - A DSL for microservice based software development
- cutevariant - A standalone and free application to explore genetics variations from VCF file. Developed by labsquare - A community for genomics software
- osxphotos - Python app to export pictures and associated metadata from Apple Photos on macOS.
- StrictDoc - Software for technical documentation and requirements management.
-
Commercial
- textX is used as a part of Typhoon-HIL's schematic editor for the description of power electronic and DSP schemes and components.
If you are using textX to build some cool stuff drop me a line at igor dot dejanovic at gmail. I would like to hear from you!
Editor/IDE support
Visual Studio Code support
There is currently an ongoing effort to build tooling support around Visual Studio Code. The idea is to auto-generate VCS plugin with syntax highlighting, outline, InteliSense, navigation, visualization. The input for the generator would be your language grammar and additional information specified using various DSLs.
Projects that are currently in progress are:
-
textX-LS - support for Language Server Protocol and VS Code for any textX based language.
-
textx-gen-coloring - a textX generator which generates syntax highlighting configuration for TextMate compatible editors (e.g. VSCode) from textX grammars.
-
textx-gen-vscode - a textX generator which generates VSCode extension from textX grammar.
-
viewX - creating visualizers for textX languages
Stay tuned ;)
Other editors
If you are a vim editor user check out support for vim.
For emacs there is textx-mode which is also available in MELPA.
You can also check out textX-ninja project. It is currently unmaintained.
Citing textX
If you are using textX in your research project we would be very grateful if you cite our paper [Dejanovic2017].
@article{Dejanovic2017,
	author = {Dejanovi\'{c}, I. and Vaderna, R. and Milosavljevi\'{c}, G. and Vukovi\'{c}, \v{Z}.},
	doi = {10.1016/j.knosys.2016.10.023},
	issn = {0950-7051},
	journal = {Knowledge-Based Systems},
	pages = {1--4},
	title = {{TextX: A Python tool for Domain-Specific Languages implementation}},
	url = {http://www.sciencedirect.com/science/article/pii/S0950705116304178},
	volume = {115},
	year = {2017}
}
Hello World example
This is an example of very simple Hello World like language.
A .tx file extension is used for textX grammar. See textX
grammar on what you can do inside a grammar file, including
comments!
These are the steps to build a very basic Hello World - like language.
-
Write a language description in textX (file
hello.tx):HelloWorldModel: 'hello' to_greet+=Who[','] ; Who: name = /[^,]*/ ;Description consists of a set of parsing rules which at the same time describe Python classes that will be dynamically created and used to instantiate objects of your model. This small example consists of two rules:
HelloWorldModelandWho.HelloWorldModelstarts with the keywordhelloafter which a one or moreWhoobject must be written separated by commas.Whoobjects will be parsed, instantiated and stored in ato_greetlist on aHelloWorldModelobject.Whoobjects consists only of its names which must be matched the regular expression rule/[^,]*/(match non-comma zero or more times). Please see textX grammar section for more information on writing grammar rules. -
At this point you can check and visualise meta-model using following command from the command line:
 $ textx generate hello.tx --target dot
 Generating dot target from models:
 /home/igor/repos/textX/textX/examples/hello_world/hello.tx
 -> /home/igor/repos/textX/textX/examples/hello_world/hello.dot
   To convert to png run "dot -Tpng -O hello.dot"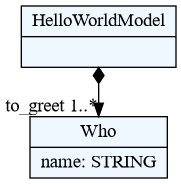
You can see that for each rule from language description an appropriate Python class has been created. A BASETYPE hierarchy is built-in. Each meta-model has it.
-
Create some content (i.e. model) in your new language (
example.hello):hello World, Solar System, UniverseYour language syntax is also described by language rules from step 1.
If we break down the text of the example model it looks like this:
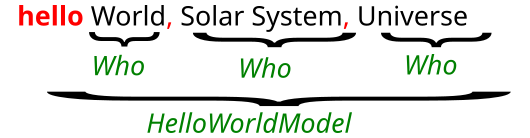
We see that the whole line is a
HelloWorldModeland the partsWorld,Solar System, andUniverseareWhoobjects. Red coloured text is syntactic noise that is needed by the parser (and programmers) to recognize the boundaries of the objects in the text. -
To use your models from Python first create meta-model from textX language description (file
hello.py):from textx import metamodel_from_file hello_meta = metamodel_from_file('hello.tx') -
Than use meta-model to create models from textual description:
hello_model = hello_meta.model_from_file('example.hello')Textual model
example.hellowill be parsed and transformed to plain Python objects. Python classes of the created objects are those defined by the meta-model. Returned objecthello_modelwill be a reference to the root of the model, i.e. the object of classHelloWorldModel. You can use the model as any other Python object. For example:print("Greeting", ", ".join([to_greet.name for to_greet in hello_model.to_greet])) -
You can optionally export model to
dotfile to visualize it. Run following from the command line:$ textx generate example.hello --grammar hello.tx --target dot Generating dot target from models: /home/igor/repos/textX/textX/examples/hello_world/example.hello -> /home/igor/repos/textX/textX/examples/hello_world/example.dot To convert to png run "dot -Tpng -O example.dot"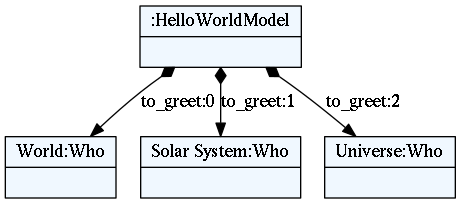
This is an object graph automatically constructed from
example.hellofile.We see that each
Whoobject is contained in the python attributeto_greetof list type which is defined by the grammar. -
Use your model: interpret it, generate code … It is a plain Python graph of objects with plain attributes!
Try out a complete tutorial for building a simple robot language.
textX grammar
The language syntax and the meta-model are defined by the textX grammar in the form of a set of textX rules.
Rules
The basic building blocks of the textX language are rules. Each rule is written in the following form:
Hello:
  'hello' who=ID
;
This rule is called Hello. After the rule name, there is a colon. The body of
the rule is given as a textX expression, starting at the colon and ending with a
semicolon. This rule tells us that the pattern of Hello objects in input
strings consists of the string literal hello, followed by the ID rule (here ID
is a reference to a built-in rule, more about this in a moment).
These are valid Hello objects:
hello Alice
hello Bob
hello foo1234
Rule Hello at the same time defines a Python class Hello. When the rule is
recognized in the input stream, an object of this class will get created and the
attribute who will be set to whatever the rule ID has matched after the word
hello (this is specified by the assignment who=ID).
Of course, there are many more rule expressions than those shown in this small example. In the next section, a detailed description of each textX expression is given.
textX base types
In the previous example you have seen an ID rule. This rule is one of the
built-in rules that form the base of textX's type system. Base types/rules are
depicted in the following figure:
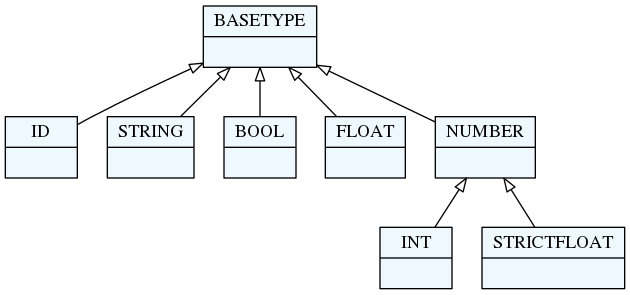
IDrule: matches a common identifier consisting of letters, digits and underscores. The regex pattern that describe this rule is'[^\d\W]\w*\b'. This match will be converted to a Python string.INTrule: matches an integer number. This match will be converted to a Pythonintinstance.FLOATrule: will match a floating point number. This match will be converted to a Pythonfloatinstance ('FLOAT' is a direct subtype of 'BASETYPE'; in order to distinguish floats and ints, 'STRICTFLOAT' was introduced).STRICTFLOATrule: will match a floating point number. This match will be converted to a Pythonfloatinstance. A 'STRICTFLOAT' will not match an 'INT' (without "." or "e|E"). A 'NUMBER' is either a 'STRICTFLOAT' or an 'INT', and will, thus, be converted to a float or an int, respectively.BOOLrule: matches the wordstrueorfalse. This match will be converted to a Pythonboolinstance.STRINGrule: matches a quoted string. This match will be converted to a Pythonstrinstance.
textX base types are automatically converted to python types during object instantiation. See auto-initialization for more information.
Rule expressions
Rule expressions represent the body of a rule. They is specified using basic expressions and operators.
The basic expressions are:
- Matches
- String match (
'...'or"...") - Regex match (
/.../)
- String match (
- Sequence
- Ordered choice (
|) - Optional (
?) - Repetitions
- Zero or more (
*) - One or more (
+) - Unordered group (
#)
- Zero or more (
- References
- Match reference
- Link reference (
[..])
- Assignments
- Plain (
=) - Boolean (
?=) - Zero or more (
*=) - One or more (
+=)
- Plain (
- Syntactic predicates
- Not (
!) - negative lookahead - And (
&) - positive lookahead
- Not (
- Match suppression
Matches
Match expressions are, besides base type rules, the expressions at the lowest level. They are the basic building blocks for more complex expressions. These expressions will consume input on success.
There are two types of match expressions:
-
String match - is written as a single quoted string. It will match a literal string on the input.
Here are a few examples of string matches:
'blue' 'zero' 'person' -
Regex match - uses regular expression defined inside
/ /to match the input. Therefore, it defines a whole class of strings that can be matched. Internally a pythonremodule is used.Here are few example of regex matches:
  /\d*/
  /\d{3,4}-\d{3}/
  /[-\w]*\b/
  /[^}]*/
For more information on Regular Expression in Python see Regular Expression HOWTO.
When the metamodel has the option
use_regexp_groupset toTrue, then a regular expression with exactly one group is replaced by the group. This can be used to define multiline strings to be stored in the model without the surrounding limiters:Model: 'data' '=' data=/(?ms)\"{3}(.*?)\"{3}/;An example model could be
    data = """
    This is a multiline
    text!
    """
When creating a metamodel with this grammar and the option
use_regexp_groupenabled, a multiline string delimited with"""is accepted:(?ms)activates the multiline option and the dot matches everything option.\"{3}matches the delimited""". The pattern"(.*?)is a non-greedy variant of get anything.metamodel = metamodel_from_str(grammar, use_regexp_group=True)
Sequence
Sequence is a textX expression that is given by just writing contained sub-expressions one after another. For example,the following rule:
Colors:
  "red" "green" "blue"
;
is defined as a sequence consisting of three string matches (red green and
blue). Contained expressions will be matched in the exact order they are
given. If some of the expressions do not match, the sequence as a whole will
fail. The above rule defined by the sequence will match only the following
string:
red green blue
If whitespace skipping is enabled (it is by default), arbitrary whitespaces can occur between matched words.
Ordered choice
Ordered choice is given as a set of expression separated by the| operator.
This operator will try to match contained expression from left to right and the
first match that succeeds will be used.
Example:
Color:
  "red" | "green" | "blue"
;
This will match either red or green or blue and the parser will try to
match the expressions in that order.
In most classic parsing technologies an unordered match (alternative) is used. This may lead to ambiguous grammars where multiple parse tree may exist for the same input string.
Underlying parsing technology of textX
is Arpeggio which is a parser based
on PEG grammars and thus the | operator directly translates to Arpeggio's PEG
ordered choice. Using ordered choice yields unambiguous parsing. If the text
parses there is only one possible parse tree.
Optional
Optional is an expression that will match the contained expression if that is
possible, but will not fail otherwise. Thus, optional expression always
succeeds.
Example:
MoveUp:
  'up' INT?
;
INT match is optional in this example. This means that the up keyword is
required, but the following integer may or may not be found.
Following lines will match:
up 45
up 1
up
Optional expressions can be more complex. For example:
MoveUp:
  'up' ( INT | FLOAT )?
Now, an ordered choice in the parentheses is optional.
Repetitions
-
Zero or more repetition is specified by the
*operator and will match the contained expression zero or more times. Here is an example:Colors: ("red"|"green"|"blue")* ;In this example zero or more repetition is applied on the ordered choice. In each repeated match one color will be matched, trying from left to right. Thus,
Colorsrule will match color as many times as possible, but will not fail if no color exists in the input string. The following would be matched by theColorsrule:red blue greenbut also:
red blue blue red red greenor an empty string.
-
One or more repetition is specified by
+operator and will match the contained expression one or more times. Thus, everything that is written for zero or more applies here except that at least one match must be found for this expression to succeed. Here is an above example modified to match at least one color:Colors: ("red"|"green"|"blue")+ ; -
Unordered group is a special kind of a sequence. Syntactically it is similar to a repetition. It is specified by the
#operator and must be applied to either sequences or ordered choices. This operator will match each element of the sequence or the ordered choice in an arbitrary order:Colors: ("red" "green" "blue")# ;For the previous example all following lines are valid:
  red blue green
  red green blue
  blue green red
  ...
But, the following lines are not valid:
  red blue red green
  blue green
Consider this example:
  Modifier:
      (static?='static' final?='final' visibility=Visibility)#
  ;

  Visibility:
      'public' | 'private' | 'protected';
We want to provide modifiers to the type declarations in our language. Furthermore, we want modifiers to be written in any order.
The following lines will match (thanks to
?=operator, only visibility must be specified):public public static final protected static ...You can combine unordered groups with parenthesized groups. Lets look at the following example:
  Unordered:
    (('first' 'second')  'third')#
  ;
This will match group with sequence
first secondandthirdin arbitrary order but the sequencefirst secondmaintains the order. Thus, these inputs will match:first second third third first secondBut these won't:
  third second first
  second first third
Alternatively, you can use ordered choice instead of grouping. This will be equivalent with the previous example:
  Unordered:
    ('first' 'second' | 'third')#
  ;
Unordered group may also have repetition modifiers defined.
Assignments
Assignments are used as a part of the meta-model deduction process. Each assignment will result in an attribute of the meta-class created by the rule.
Each assignment consists of the LHS (left-hand side) and the RHS (right-hand side). The LHS is always a name of the meta-class attribute while the RHS can be a reference to other rules (either a match or a link reference) or a simple match (string or regex match). For example:
Person:
  name=Name ',' surname=Surname ',' age=INT ',' height=INT ';'
;
The Name and Surname rules referenced in the RHS of the first two
assignments are not given in this example.
This example describes the rule and meta-class Person, that will parse and
instantiate the Person objects with these four attributes:
name- which will use the ruleNameto match the input, it will be a reference to the instance of theNameclass,surname- will useSurnamerule to match the input,age- will use the built-in typeINTto match a number from the input string.agewill be converted to the pythoninttype.height- the same asage, but the matched number will be assigned to theheightattribute of thePersoninstance.
Notice the comma as the separator between matches and the semicolon match at the end of the rule. Those matches must be found in the input but the matched strings will be discarded. They represent a syntactic noise.
If the RHS is one of textX BASETYPEs, then the matched string will be converted
to some of the plain python types (e.g. int, string, boolean).
If the RHS is a string or regex match like in this example:
Color:
  color=/\w+/
;
then the attribute given by the LHS will be set as the string matched by the RHS regular expression or string.
If the RHS is a reference to some other rule, then the attribute given by the LHS will be set to refer to the object created by the RHS rule.
Following strings are matched by the Person rule from above:
Petar, Petrovic, 27, 185;
John, Doe, 34, 178;
There are four types of assignments:
-
Plain assignment (
=) will match its RHS once and assign what is matched to the attribute given by the LHS. The above example uses plain assignments.Examples:
a=INT b=FLOAT c=/[a-Z0-9]+/ dir=Direction -
Boolean assignment (
?=) will set the attribute toTrueif the RHS match succeeds and toFalseotherwise.Examples::
cold ?= 'cold' number_given ?= INT -
Zero or more assignment (
*=) - LHS attribute will be alist. This assignment will keep matching the RHS as long as the match succeeds and each matched object will be appended to the attribute. If no match succeeds, the attribute will be an empty list.Examples::
commands*=Command numbers*=INT -
One or more assignment (
+=) - same as the previous assignment, but it must match the RHS at least once. If no match succeeds, this assignment does not succeed.
Multiple assignment to the same attribute
textX allows for multiple assignments to the same attribute. For example:
  MyRule:
      a=INT b=FLOAT a*=ID
  ;
Here a attribute will always be a Python list. The type of a will be
OBJECT as the two assignments have declared different types for a (INT and
ID).
Consider this example:
  Method:
      'func(' (params+=Parameter[','])? ')'
  ;
  Parameter:
      type=ID name=ID | name=ID
  ;
In Parameter rule, the name attribute assignments are part of different
ordered choice alternatives and thus name will never have more than one value
and thus should not be a list. The type of name is consistent in both
assignments so it will be ID.
The rule of the thumb for multiple assignments is that if there is no possibility for an attribute to collect more than one value during parsing it will be a single value object, otherwise it will be a list.
References
Rules can reference each other. References are usually used as a RHS of the assignments. There are two types of rule references:
-
Match rule reference - will call another rule. When instance of the called rule is created, it will be assigned to the attribute on the LHS. We say that the referred object is contained inside the referring object (i.e. they form a parent-child relationship).
Example::
Structure: 'structure' '{' elements*=StructureElement '}' ;StructureElementwill be matched zero or more times. With each match, a new instance of theStructureElementwill be created and appended to theelementspython list. Aparentattribute of eachStructureElementwill be set to the containingStructure. -
Link rule reference - is written as a referred rule name inside square brackets. It will match an identifier of some class object at the given place and convert that identifier to a Python reference to the target object. This reference resolving is done automatically by textX. By default, a
nameattribute is used as the identifier of the object. By default, all objects of the same class are in a single namespace. This can be configured by scope providers and Reference Resolving Expression Language.Example:
  ScreenType:
    'screen' name=ID "{"
    '}'
  ;

  ScreenInstance:
    'screen' type=[ScreenType]
  ;
The
typeattribute is a link to theScreenTypeobject. This is a valid usage:// This is a definition of the ScreenType object screen Introduction { } // And this is a reference link to the ScreenType object defined above // ScreenInstance instance screen IntroductionIntroductionwill be matched, theScreenTypeobject with that name will be found and thetypeattribute ofScreenInstanceinstance will be set to it.IDrule is used by default to match the link identifier. If you want to change that, you can use the following syntax:ScreenInstance: 'screen' type=[ScreenType:WORD] ;Here, instead of
IDaWORDrule is used to match the object's identifier.
Attributes with name names are used for reference auto-resolving. By default,
a dict lookup is used, thus they must be of a hashable type. See issues
#40 and
#266.
A usual error is to match the name in this fashion:
MyObj: name+=ID['.'];
Here, name will be a list of strings that are separated by dot and that will
not work as the name must be hashable. The best way to implement this and make
name hashable is:
MyObj: name=FQN;
FQN: ID+['.'];
Now, name will be the string returned by the FQN match rule.
Syntactic predicates
Syntactic predicates are operators that are used to implement lookahead. The lookahead is used to do parsing decision based on the part of the input ahead of the current position. Syntactic predicates are written as a prefix of some textX rule expression. The rule expression will be used to match input ahead of the current location in the input string. It will either fail or succeed but will never consume any input.
There are two type of syntactic predicates:
-
Not - negative lookahead (
!) - will succeed if the current input doesn't match the expression given after the!operator.Example problem:
  Expression: Let | ID | NUMBER;
  Let:
      'let'
          expr+=Expression
      'end'
  ;
In this example we have nested expressions built with indirectly recurssive
Letrule. The problem is that theIDrule fromExpressionwill match keywordendand thus will consume end ofLetrule, so the parser will hit EOF without completing anyLetrules. To fix this, we can specify thatIDwill match any identifier except keywordsletandendlike this:Expression: Let | MyID | NUMBER; Let: 'let' expr+=Expression 'end' ; Keyword: 'let' | 'end'; MyID: !Keyword ID;Now,
MyIDwill matchIDonly if it is not a keyword. -
And - positive lookahead (
&) - will succeed if the current input starts with the string matched by the expression given after the&operator.Example:
  Model:
      elements+=Element
  ;
  Element:
      AbeforeB | A | B
  ;
  AbeforeB:
      a='a' &'b'      // this succeeds only if 'b' follows 'a'
  ;
  A: a='a';
  B: a='b';
Given the input string
a a a bfirst twoachars will be matched by the ruleA, but the thirdawill be matched by the ruleAbeforeB. So, even whenAbeforeBmatches onlyaand is tried before any other match, it will not succeed for the first twoachars because they are not followed byb.
Match suppression
Sometimes it is necessary to define match rules that should return only parts of
the match. For that we use match the suppression operator (-) after the
expression you want to suppress.
For example:
FullyQualifiedID[noskipws]:
    /\s*/-
    QuotedID+['.']
    /\s*/-
;
QuotedID:
    '"'?- ID '"'?-
;
Because we use noskipws rule modifier, FullyQualifiedID does not skip
whitespaces automatically. Thus, we have to match whitespaces ourself, but we
don't want those whitespaces in the resulting string. You might wonder why we
are using noskipws. It is because we do not want whitespaces in between each
QuotedID match. So, for example, first. second shouldn't match but
first.second should.
In the rule FullyQualifiedID we are suppressing whitespace matches /\s*/-.
We also state in QuotedID that there are optional quotation marks around each
ID, but we don't want those either '"'?-.
Given this input:
first."second".third."fourth"
FullyQualifiedID will return:
first.second.third.fourth
Repetition modifiers
Repetition modifiers are used for the modification of the repetition expressions
(*, +, #, *=, +=). They are specified in brackets [ ]. If there are
more modifiers, they are separated by a comma.
Currently, there are two modifiers defined:
-
Separator modifier - is used to define separator on multiple matches. Separator is a simple match (string match or regex match).
Example:
numbers*=INT[',']Here, a separator string match is defined (
','). This will match zero or more integers separated by commas.45, 47, 3, 78A regex can also be specified as a separator.
fields += ID[/;|,|:/]This will match IDs separated by either
;or,or:.first, second; third, fourth: fifth -
End-of-line terminate modifier (
eolterm) - used to terminate repetition on end-of-line. By default the repetition match will span lines. When this modifier is specified, repetition will work inside the current line only.Example:
STRING*[',', eolterm]Here we have a separator as well as the
eoltermdefined. This will match zero or more strings separated by commas inside one line."first", "second", "third" "fourth"If we run the example expression once on this string, it will match the first line only.
"fourth"in the second line will not be matched.
Be aware that when eolterm modifier is used, its effect starts from the
previous match. For example:
Conditions:
  'conditions' '{'
    varNames+=WORD[eolterm]    // match var names until end of line
  '}'
In this example varNames must be matched in the same line as
conditions { because eolterm effect start immediately.
In this example we wanted to give the user the freedom to specify var names on
the next line, even to put some empty lines if he/she wishes. In order to do
that, we should modify the example like this::
Conditions:
  'conditions' '{'
    /\s*/
    varNames+=WORD[eolterm]    // match var names until end of line
  '}'
Regex match /\s*/ will collect whitespaces (spaces and new-lines)
before the WORD match begins. Afterwards, repeated matches will work
inside one line only.
Rule types
There are three kinds of rules in textX:
- Common rules (or just rules)
- Abstract rules
- Match rules
Common rules are rules that contain at least one assignment, i.e., they have attributes defined. For example:
InitialCommand:
  'initial' x=INT ',' y=INT
;
This rule has two defined attributes: x and y.
Abstract rules are rules that have no assignments and reference at least one abstract or common rule. They are usually given as an ordered choice of other rules and they are used to generalize other rules. For example:
Program:
  'begin'
    commands*=Command
  'end'
;

Command:
  MoveCommand | InitialCommand
;
In this example, Python objects in the commands list will either contain
instances of MoveCommand or InitialCommand. Command rule is abstract. A
meta-class of this rule will never be instantiated. Abstract rule can also be
used in link rule references:
ListOfCommands:
  commands*=[Command][',']
;
Abstract rules may reference match rules and base types. For example:
Value:
    STRING | FLOAT | BOOL | Object | Array | "null"
;
In this example, the base types as well as the string match "null" are all
match rules, but Object and Array are common rules and therefore Value is
abstract.
Abstract rules can be a complex mix of rule references and match expressions as long as there is at least one abstract or common reference. For example:
Value:
  'id' /\d+-\d+/ | FLOAT | Object
;
A rule with a single reference to an abstract or common rule is also abstract:
Value:
  OtherRule
;
Abstract rules can have multiple references in a single alternative with the following rules:
- If all rule references in a single alternative are match rules the result will be a concatenation of all match rule results,
- If there is a common rule reference then it would be the result and all surrounding match rules are used only for parsing
- If there are multiple common rules then the first will be used as a result and the rest only for parsing
For example:
Model: STRING | ID | '#' Rule1 Sufix;  // abstract rule
Rule1: a=INT;  // common rule
Prefix: '#';
Sufix: ID | SomeOtherSufix;
SomeOtherSufix: '--' '#';
In this example matching # 42 -- # at input would yield and instance of
Rule1 with attribute a set to integer 42. This comes from a third
alternative '#' Rule1 Sufix that succeeds and the # and Sufix would be
used just for parsing and the result would be discarded.
Another example:
Model: (STRING | ID | '#' Rule1) Sufix;
Rule1: a=INT; // common rule
Sufix: '--';
This is also abstract rule as we are referencing Rule1 which is a common rule
and we have no assignments. Matching # 42 -- as input will give an instance of
Rule1 with attribute a set to integer 42.
In this example:
Model: STRING|Rule1|ID|Prefix INT Sufix;
Rule1: a='a';  // a common rule
Prefix: '#';
Sufix: '--';
we see that input # 42 -- would be recognized by the last alternative and the
result will be string #42--, i.e. all match rule results would be concatenated.
But if we give a as input than the result will be an instance of Rule1 with
attribute a set to string 'a'.
In the following example we see what happens if we have multiple common rule references:
Model: STRING|Rule1|ID|Prefix Rule1 Sufix Rule2;  // Reference both Rule1 and Rule2
Rule1: a=INT; // common rule
Rule2: a=STRING; // common rule
Prefix: '#';
Sufix: '--';
For input # 42 -- "some string" the model will be an instance of Rule1 with
attribute a set to 42 as it is the first common rule reference in the last
alternative (the one that succeeds) but Rule2, despite being discarded, must
also be satisfied during parsing or syntax error would be produced.
Match rules are rules that have no assignments either direct or indirect, i.e. all referenced rules are match rules too. They are usually used to specify enumerated values or some complex string matches that can't be done with regular expressions.
Examples:
Widget:
  "edit"|"combo"|"checkbox"|"togglebutton"
;

Name:
  STRING|/(\w|\+|-)+/
;

Value:
  /(\w|\+|-)+/ | FLOAT | INT
;
These rules can be used in match references only (i.e., you can't link to these
rules as they don't exists as objects), and they produce objects of the base
python types (str, int, bool, float).
All base type rules (e.g., INT, STRING, BASETYPE) are match rules.
Rule modifiers
Rule modifiers are used for the modification of the rule's expression. They are
specified in brackets ([ ]) at the beginning of the rule's definition after
the rule's name. Currently, they are used to alter parser configuration for
whitespace handling on the rule level.
Rule modifiers act on the current rule and all rules referenced inside the rule (recursively): unless a refrenced rule has an explicit rule modifier, the currently active modifier state is propagated to referenced rules.
There are two rule modifiers at the moment:
-
skipws, noskipws - are used to enable/disable whitespace skipping during parsing. This will change the global parser's
skipwssetting given during the meta-model instantiation.Example:
Rule:
    'entity' name=ID /\s*/ call=Rule2;
Rule2[noskipws]:
    'first' 'second';
In this example
Rulerule will use default parser behaviour set during the meta-model instantiation, whileRule2rule will disable whitespace skipping. This will changeRule2to match the wordfirstsecond, but not wordsfirst secondwith whitespaces in between. -
ws - used to redefine what is considered to be a whitespaces on the rule level. textX by default treats space, tab and new-line as a whitespace characters. This can be changed globally during the meta-model instantiation (see Whitespace handling) or per rule using this modifier.
Example:
Rule:
    'entity' name=ID /\s*/ call=Rule2;
Rule2[ws='\n']:
    'first' 'second';
In this example
Rulewill use the default parser behavior but theRule2will alter the white-space definition to be new-line only. This means that the wordsfirstandsecondwill get matched only if they are on separate lines or in the same line but without other characters in between (even tabs and spaces).
Grammar comments
Syntax for comments inside a grammar is // for line comments and /* ... */
for block comments.
Language comments
To support comments in your DSL use a special grammar rule Comment. textX will
try to match this rule in between each other normal grammar match (similarly to
the whitespace matching). If the match succeeds, the matched content will be
discarded.
For example, in the robot language example comments are defined like this:
Comment:
  /\/\/.*$/
;
Which states that everything starting with // and continuing until the end of
line is a comment.
Grammar modularization
Grammars can be defined in multiple files and then imported. Rules used in the references are first searched for in the current file and then in the imported files, in the order of the import.
Example:
import scheme

Library:
  'library' name=Name '{'
    attributes*=LibraryAttribute

    scheme=Scheme

  '}'
;
Scheme rule is defined in scheme.tx grammar file imported at the beginning.
Grammar files may be located in folders. In that case, dot notation is used.
Example:
import component.types
types.tx grammar is located in the component folder relatively to the
current grammar file.
If you want to override the default search order, you can specify a fully qualified name of the rule using dot notation when giving the name of the referring object.
Example:
import component.types

MyRule:
  a = component.types.List
;

List:
  '[' values+=BASETYPE[','] ']'
;
List from component.types is matched/instantiated and set to a attribute.
Inspecting textX grammars programmatically
Since textX is a meta-language (a language for language definition) any textual language can be specified using it, even textX grammar language itself.
This definition enable loading of textX grammar as a plain Python model which can be further analyzed for various purposes. This can be used, e.g. for tooling which need to analyze the grammar beyond of just syntactic and semantic checks (e.g. syntax highlighting may analyze grammar to discover keywords that needs to be colored).
To load grammar model first get the textX language meta-model with:
textx_mm = metamodel_for_language('textx')
and then call either grammar_model_from_str or grammar_model_from_file
method on this meta-model object:
grammar_model = textx_mm.grammar_model_from_file(
    join(abspath(dirname(__file__)), 'pyflies.tx'))
Then investigate this model as you would do with any other model:
assert len(grammar_model.imports_or_references) == 3
assert len(grammar_model.rules) == 45

str_matches = get_children_of_type("SimpleMatch", grammar_model)
...
textX meta-models
textX meta-model is a Python object that knows about all classes that can be
instantiated while parsing the input. A meta-model is built from the grammar by
the functions metamodel_from_file or metamodel_from_str in the
textx.metamodel module.
from textx import metamodel_from_file
my_metamodel = metamodel_from_file('my_grammar.tx')
Each rule from the grammar will result in a Python class kept in the meta-model. Besides, meta-model knows how to parse the input strings and convert them to model.
Parsing the input and creating the model is done by model_from_file and
model_from_str methods of the meta-model object:
my_model = my_metamodel.model_from_file('some_input.md')
When parsing a model file or string a new parser is cloned for each model.
This parser can be accessed via the model attribute _tx_parser.
Custom classes
For each grammar rule a Python class with the same name is created dynamically.
These classes are instantiated during the parsing of the input string/file to
create a graph of python objects, a.k.a. model or Abstract-Syntax Tree (AST).
Most of the time dynamically created classes will be sufficient, but sometimes
you will want to use your own classes instead. To do so use parameter classes
during the meta-model instantiation. This parameter is a list of your classes
that should be named the same as the rules from the grammar which they
represent.
from textx import metamodel_from_str

grammar = '''
EntityModel:
  entities+=Entity    // each model has one or more entities
;

Entity:
  'entity' name=ID '{'
    attributes+=Attribute     // each entity has one or more attributes
  '}'
;

Attribute:
  name=ID ':' type=[Entity]   // type is a reference to an entity. There are
                              // built-in entities registered on the meta-model
                              // for primitive types (integer, string)
;
'''

class Entity:
  def __init__(self, parent, name, attributes):
    self.parent = parent
    self.name = name
    self.attributes = attributes


# Use our Entity class. "Attribute" class will be created dynamically.
entity_mm = metamodel_from_str(grammar, classes=[Entity])
Now entity_mm can be used to parse the input models where our Entity class
will be instantiated to represent each Entity rule from the grammar.
When passing a list of classes (as shown in the example above), you need to have rules for all of these classes in your grammar (else, you get an exception). Alternatively, you can also pass a callable (instead of a list of classes) to return user classes given a rule name. In that case, only rule names found in the grammar are used to query user classes. See unittest.
Constructor of the user-defined classes should accept all attributes defined by
the corresponding rule from the grammar. In the previous example, we have
provided name and attributes attributes from the Entity rule. If the class
is a child in a parent-child relationship (see the next section), then the
parent constructor parameter should also be given.
Classes that use __slots__ are supported. Also, initialization of custom
classes is postponed during model loading and done after reference resolving but
before object processors call (see Using the scope provider to modify a
model) to ensure that
immutable objects (e.g. using attr frozen
feature), that
can't be changed after initialization, are also supported.
Parent-child relationships
There is often an intrinsic parent-child relationship between object in the
model. In the previous example, each Attribute instance will always be a child
of some Entity object.
textX gives automatic support for these relationships by providing the parent
attribute on each child object.
When you navigate model each child instance will have a parent
attribute.
Always provide the parent parameter in user-defined classes for each class that is a child in a parent-child relationship.
Processors
To specify static semantics of the language textX uses a concept called processor. Processors are python callables that can modify the model elements during model parsing/instantiation or do some additional checks that are not possible to do by the grammar alone.
There are two types of processors:
- model processors - are callables that are called at the end of the parsing when the whole model is instantiated. These processors accept the model and meta-model as parameters.
- object processors - are registered for particular classes (grammar rules) and are called when the objects of the given class is instantiated.
Processors can modify model/objects or raise exception (TextXSemanticError) if
some constraint is not met. User code that calls the model instantiation/parsing
can catch and handle this exception.
Model processors
To register a model processor call register_model_processor on the meta-model
instance.
from textx import metamodel_from_file

# Model processor is a callable that will accept meta-model and model as its
# parameters.
def check_some_semantics(model, metamodel):
  ...
  ... Do some check on the model and raise TextXSemanticError if the semantics
  ... rules are violated.

my_metamodel = metamodel_from_file('mygrammar.tx')

# Register model processor on the meta-model instance
my_metamodel.register_model_processor(check_some_semantics)

# Parse the model. check_some_semantics will be called automatically after
# a successful parse to do further checks. If the rules are not met,
# an instance of TextXSemanticError will be raised.
my_metamodel.model_from_file('some_model.ext')
Object processors
The purpose of the object processors is to validate or alter the object being constructed. They are registered per class/rule.
Let's do some additional checks for the above Entity DSL example.
def entity_obj_processor(entity):
  '''
  Check that Ethe ntity names are capitalized. This could also be specified
  in the grammar using regex match but we will do that check here just
  as an example.
  '''

  if entity.name != entity.name.capitalize():
    raise TextXSemanticError('Entity name "%s" must be capitalized.' %
                            entity.name, **get_location(entity))

def attribute_obj_processor(attribute):
  '''
  Obj. processors can also introduce changes in the objects they process.
  Here we set "primitive" attribute based on the Entity they refer to.
  '''
  attribute.primitive = attribute.type.name in ['integer', 'string']


# Object processors are registered by defining a map between a rule name
# and the callable that will process the instances of that rule/class.
obj_processors = {
    'Entity': entity_obj_processor,
    'Attribute': attribute_obj_processor,
    }

# This map/dict is registered on a meta-model by the "register_obj_processors"
# call.
entity_mm.register_obj_processors(obj_processors)

# Parse the model. At each successful parse of Entity or Attribute, the registered
# processor will be called and the semantics error will be raised if the
# check does not pass.
entity_mm.model_from_file('my_entity_model.ent')
For another example of the usage of an object processor that modifies the
objects, see object processor
move_command_processor robot example.
If object processor returns a value that value will be used instead of the original object. This can be used to implement e.g. expression evaluators or on-the-fly model interpretation. For more information
For more information please take a look at the tests.
Object processors decorated with textx.textxerror_wrap will transform
any exceptions not derived from TextXError to a TextXError (including
line/column and filename information). This can be useful, if
object processors transform values using non-textx libraries (like datetime)
and you wish to get the location in the model file, where errors occur
while transforming the data (see
these tests).
Built-in objects
Often, you will need objects that should be a part of each model and you do not
want users to specify them in every model they create. The most notable example
are primitive types (e.g. integer, string, bool).
Let's provide integer and string Entities to our Entity meta-model in
order to simplify the model creation so that the users can use the names of
these two entities as the Attribute types.
class Entity:
    def __init__(self, parent, name, attributes):
        self.parent = parent
        self.name = name
        self.attributes = attributes

entity_builtins = {
        'integer': Entity(None, 'integer', []),
        'string': Entity(None, 'string', [])
}
entity_mm = metamodel_from_file(
  'entity.tx',
  classes=[Entity]            # Register Entity user class,
  builtins=entity_builtins    # Register integer and string built-in objs
)
Now an integer and string Attribute types can be used.
See model
and
Entitiy
example for more.
Creating your own base type
Match rules by default return Python string type.
Built-in match rules (i.e. BASETYPEs) on the other hand return Python base
types.
You can use object processors to create your type by specifying match rule in the grammar and object processor for that rule that will create an object of a proper Python type.
Example:
Model:
  'begin' some_number=MyFloat 'end'
;
MyFloat:
  /\d+\.(\d+)?/
;
In this example MyFloat rule is a match rule and by default will return Python
string, so attribute some_number will be of string type. To change that,
register object processor for MyFloat rule:
mm = metamodel_from_str(grammar)
mm.register_obj_processors({'MyFloat': lambda x: float(x)}))
Now, MyFloat will always be converted to Python float type.
Using match filters you can override built-in rule's conversions like this:
Model:
  some_float=INT
;
mm = metamodel_from_str(grammar)
mm.register_obj_processors({'INT': lambda x: float(x)}))
In this example we use built-in rule INT that returns Python int type.
Registering object processor with the key INT we can change default behaviour
and convert what is matched by this rule to some other object (float in this
case).
Auto-initialization of the attributes
Each object that is recognized in the input string will be instantiated and its attributes will be set to the values parsed from the input. In the event that a defined attribute is optional, it will nevertheless be created on the instance and set to the default value.
Here is a list of the default values for each base textX type:
- ID - empty string - ''
- INT - int - 0
- FLOAT - float - 0.0 (also 0 is possible)
- STRICTFLOAT - float - 0.0 (0. or .0 or 0e1, but not 0, which is an INT)
- BOOL - bool - False
- STRING - empty string - ''
Each attribute with zero or more multiplicity (*=) that does not match any
object from the input will be initialized to an empty list.
An attribute declared with one or more multiplicity (+=) must match at least
one object from the input and will therefore be transformed to python list
containing all matched objects.
The drawback of this auto-initialization system is that we can't be sure if the attribute was missing from the input or was matched, but the given value was the same as the default value.
In some applications it is important to distinguish between those two
situations. For that purpose, there is a parameter auto_init_attributes of the
meta-model constructor that is True by default, but can be set to False to
prevent auto-initialization from taking place.
If auto-initialization is disabled, then each optional attribute that was not
matched on the input will be set to None. This is true for the plain
assignments (=). An optional assignment (?=) will always be False if the
RHS object is not matched in the input. The multiplicity assignments (*= and
+=) will always be python lists.
Optional model parameter definitions
A meta-model can define optional model parameters. Such definitions are stored
in model_param_defs and define optional parameters, which can be specified
while loading/creating a model through model_from_str or model_from_file.
Details: see tx_model_params.
metamodel.model_param_defs can be queried (like a dict) to retrieve possible
extra parameters and their descriptions for a meta-model. It is also used to
restrict the additional parameters passed to model_from_str or
model_from_file.
Default parameters are:
project_root: this model parameter is used by theGlobalRepoto set a project directory, where all file patterns not referring to an absolute file position are looked up.
An example of a custom model parameter definition used to control the behavior
of an object processor is given in
test_reference_to_nontextx_attribute.py,
(test_object_processor_with_optional_parameter_*; specifying a parameter
while loading) and
test_reference_to_nontextx_attribute.py
(defining the parameter in the metamodel).
textX models
Model is a python object graph consisting of POPOs (Plain Old Python Objects) constructed from the input string that conforms to your DSL defined by the grammar and additional model and object processors.
In a sense, this structure is an Abstract Syntax Tree (AST) known from classic parsing theory, but it is actually a graph structure where each reference is resolved to a proper python reference.
Each object is an instance of a class from the meta-model. Classes are created on-the-fly from the grammar rules or are supplied by the user.
A model is created from the input string using the model_from_file and
model_from_str methods of the meta-model instance.
from textx import metamodel_from_file

my_mm = metamodel_from_file('mygrammar.tx')

# Create model
my_model = my_mm.model_from_file('some_model.ext')
The model_from_file method takes an optional argument encoding
to control the input encoding of the model file to be loaded.
Let's take the Entity language used in Custom Classes section.
Content of entity.tx file:
EntityModel:
  entities+=Entity    // each model has one or more entities
;

Entity:
  'entity' name=ID '{'
    attributes+=Attribute     // each entity has one or more attributes
  '}'
;

Attribute:
  name=ID ':' type=[Entity]   // type is a reference to an entity. There are
                              // built-in entities registered on the meta-model
                              // for the primitive types (integer, string)
;
For the meta-model construction and built-in registration see Custom Classes and Builtins sections.
Now, we can use the entity_mm meta-model to parse and create Entity models.
person_model = entity_mm.model_from_file('person.ent')
Where person.ent file might contain this:
entity Person {
  name : string
  address: Address
  age: integer
}

entity Address {
  street : string
  city : string
  country : string
}
Model API
Functions given in this section can be imported from textx module.
get_model(obj)
obj (model object)
Finds the root of the model following parent references.
get_metamodel(obj)
Returns meta-model the model given with obj conforms to.
get_parent_of_type(typ, obj)
typ (str or class): the name of type of the type itself of the model object searched for.obj (model object): model object to start search from.
Finds first object up the parent chain of the given type. If no parent of the
given type exists None is returned.
get_children_of_type(typ, root, children_first=False, should_follow=lambda obj: True)
typ (str or python class): The type of the model object we are looking for.root (model object): Python model object which is the start of the search process.children_first (bool): indicates if children should be returned before their parents.should_follow (callable): a predicate used to decide if the object should be traversed.
Returns a list of all model elements of type typ starting from model element
root. The search process will follow containment links only. Non-containing
references shall not be followed.
get_children(selector, root, children_first=False, should_follow=lambda obj: True)
selector (callable): a predicate returning True if the object is of interest.root (model object): Python model object which is the start of the search process.children_first (bool): indicates if children should be returned before their parents.should_follow (callable): a predicate used to decide if the object should be traversed.
Returns a list of all selected model elements starting from model element
root. The search process will follow containment links only. Non-containing
references shall not be followed.
get_location(obj)
Returns the location of the textX model object in the form of a dict with
line/col/nchar/filename keys. nchar is a substring length of the obj in
the input string. Filename can be None if the model is loaded from a string.
Return value is convenient for use in TextX exceptions (e.g. raise TextXSemanticError('Some message', **get_location(model_obj)))
textx_isinstance(obj, cls)
Return True if obj is instance of cls taking into account textX rule/class
hierarchy. For textX created classes you can get a reference to a class from
meta-model by keying into it using the class name metamodel['SomeRule'].
Special model object's attributes
Beside attributes specified by the grammar, there are several special
attributes on model objects created by textX. All special attributes' names
start with prefix _tx.
These special attributes don't exist if the type of the resulting model object don't allow dynamic attribute creation (e.g. for Python base builtin types - str, int).
_tx_position and _tx_position_end
_tx_position attribute holds the position in the input string where the
object has been matched by the parser. Each object from the model object graph
has this attribute.
This is an absolute position in the input stream. To convert it to line/column
format use pos_to_linecol method of the parser.
line, col = entity_model._tx_parser.pos_to_linecol(
    person_model.entities[0]._tx_position)
Where entity_model is a model constructed by textX.
Previous example will give the line/column position of the first entity.
_tx_position_end is the position in the input stream where the object ends.
This position is one char past the last char belonging to the object. Thus,
_tx_position_end - _tx_position == length of the object str representation.
If you need line, column and filename of a textX object (e.g. for raising
TextXSemanticError) see get_location above.
_tx_filename
This attribute exists only on the root of the model. If the model is loaded
from a file, this attribute will be the full path of the source file. If the
model is created from a string this attribute will be None.
_tx_parser
This attribute represents the concrete parser instance used for the model
(the attribute _parser of the _tx_metamodel is only a blueprint for the
parser of each model instance and cannot be used, e.g., to determine model
element positions in a file. Use the _tx_parser attribute of the model
instead).
_tx_metamodel
This attribute exists only on the root of the model. It is a reference to the meta-model object used for creating the model.
_tx_fqn
Is the fully qualified name of the grammar rule/Python class in regard to the
import path of the grammar file where the rule is defined. This attribute is
used in __repr__ of auto-generated Python classes.
_tx_model_repository
The model may have a model repository (initiated by some scope provider or by the metamodel). This object is responsible to provide and cache other model instances (see textx.scoping.providers).
_tx_model_params
This attribute always exists. It holds all additional parameters passed to
model_from_str or model_from_file of a metamodel. These parameters are
restricted by the metamodel.model_param_defs object (model and object
processors), which is
controlled by the metamodel designer.
Parser configuration
Case sensitivity
Parser is by default case sensitive. For DSLs that should be case insensitive
use ignore_case parameter of the meta-model constructor call.
from textx import metamodel_from_file

my_metamodel = metamodel_from_file('mygrammar.tx', ignore_case=True)
Whitespace handling
The parser will skip whitespaces by default. Whitespaces are spaces, tabs and
newlines by default. Skipping of the whitespaces can be disabled by skipws bool
parameter in the constructor call. Also, what is a whitespace can be redefined by
the ws string parameter.
from textx import metamodel_from_file
my_metamodel = metamodel_from_file('mygrammar.tx', skipws=False, ws='\s\n')
Whitespaces and whitespace skipping can be defined in the grammar on the level of a single rule by rule modifiers.
Automatic keywords
When designing a DSL, it is usually desirable to match keywords on word
boundaries. For example, if we have Entity grammar from the above, then a word
entity will be considered a keyword and should be matched on word boundaries
only. If we have a word entity2 in the input string at the place where
entity should be matched, the match should not succeed.
We could achieve this by using a regular expression match and the word boundaries regular expression rule for each keyword-like match.
Enitity:
  /\bentity\b/ name=ID ...
But the grammar will be cumbersome to read.
textX can do automatic word boundary match for all keyword-like string matches.
To enable this feature set parameter autokwd to True in the constructor
call.
from textx import metamodel_from_file
my_metamodel = metamodel_from_file('mygrammar.tx', autokwd=True)
Any simple match from the grammar that is matched by the
regular expression [^\d\W]\w* is considered to be a keyword.
Memoization (a.k.a. packrat parsing)
This technique is based on memoizing result on each parsing expression rule. For some grammars with a lot of backtracking this can yield a significant speed increase at the expense of some memory used for the memoization cache.
Starting with textX 1.4 this feature is disabled by default. If you think that
parsing is slow, try to enable memoization by setting memoization parameter to
True during meta-model instantiation.
from textx import metamodel_from_file
my_metamodel = metamodel_from_file('mygrammar.tx', memoization=True)
textx command/tool
Executing textX related CLI commands
textX has an extensible CLI tool which is a central hub for all textX CLI commands.
When you install textX with cli dependencies (pip install textX[cli]) you get
a CLI command textx which you call to execute any of the registered
sub-commands.
textX registers several sub-commands:
check- used to check models and meta-models for syntax and semantic validitygenerate- used to call registered generators and transform given models to other target languages. This command is also used to visualize models and meta-models by generating visualizations. To see how to register your own generators head over to registration/discover section.list-languages/list-generators- used to list registered languages and generators (see the registration/discover feature for more explanations)
We eat our own dog food so all sub-commands are registered using the same mechanism and there is no distinction between the core commands provided by the textX itself and the commands provided by third-party Python packages.
Please, see Extending textx command section bellow
on how to define your own sub-commands investigate pyproject.toml of the textX
project.
Some of development commands/tools are registered by
textX-dev project which is an optional dev
dependency of textX. In order to have all these commands available you can
either install textX-dev project or install textX dev dependencies with pip install textX[dev].
Using the tool
To see all available sub-commands just call the textx:
$ textx
Usage: textx [OPTIONS] COMMAND [ARGS]...

Options:
  --debug  Debug/trace output.
  --help   Show this message and exit.

Commands:
  check            Check/validate model given its file path.
  generate         Run code generator on a provided model(s).
  list-generators  List all registered generators
  list-languages   List all registered languages
To get a help on a specific command:
$ textx check --help
Usage: textx check [OPTIONS] MODEL_FILES...

  Check/validate model given its file path. If grammar is given use it to
  construct the meta-model. If language is given use it to retrieve the
  registered meta-model.

  Examples:

  # textX language is built-in, so always registered:
  textx check entity.tx

  # If the language is not registered you must provide the grammar:
  textx check person.ent --grammar entity.tx

  # or if we have language registered (see: text list-languages) it's just:
  textx check person.ent

  # Use "--language" if meta-model can't be deduced by file extension:
  textx check person.txt --language entity

  # Or to check multiple model files and deduce meta-model by extension
  textx check *

Options:
  --language TEXT    A name of the language model conforms to.
  --grammar TEXT     A file name of the grammar used as a meta-model.
  -i, --ignore-case  Case-insensitive model parsing. Used only if "grammar" is
                     provided.
  --help             Show this message and exit.
Extending textx command
textx command can be extended from other installed Python packages using
entry
points.
Using command extension one can add new commands and command groups to the
textx command.
textx uses click library for CLI commands
processing. That makes really easy to create new commands and command groups.
To create a new command you need to provide a Python function accepting a
click command group (in this case a top level textx command) and use the
group to register additional commands using click decorators.
For example:
import click

def testcommand(textx):
  @textx.command()
  @click.argument('some_argument', type=click.Path())
  @click.option('--some-option', default=False, is_flag=True,
                help="Testing option in custom command.")
  def testcommand(some_argument, some_option):
      """
      This command will be found as a sub-command of `textx` command once this
      project is installed.
      """
      click.echo("Hello sub-command test!")
Register new command in your project's pyproject.toml file under the entry
point textx_commands (we are assuming that testcommand function is in
package cli).
[project.entry-points.textx_commands]
testcommand = "cli:testcommand"
If you install now your project in the same Python environment where textX is
installed you will see that textx command now has your command registered.
$ textx
Usage: textx [OPTIONS] COMMAND [ARGS]...

Options:
  --debug  Debug/trace output.
  --help   Show this message and exit.

Commands:
  check        Check validity of meta-model and optionally model.
  testcommand  This command will be found as a sub-command of `textx`...
  visualize    Generate .dot file(s) from meta-model and optionally model.


$ textx testcommand some_argument
Hello sub-command test!
Similarly you can create new command groups. You can have a group level options and a command level options and arguments.
Here is a full example:
import click

def create_testgroup(textx):
    @textx.group()
    @click.option('--group-option', default=False, is_flag=True,
                  help="Some group option.")
    def testgroup(group_option):
        """Here we write group explanation."""
        pass

    @testgroup.command()
    @click.argument('some_argument', type=click.Path())
    @click.option('--some-option', default=False, is_flag=True,
                  help="Testing option in custom command.")
    def groupcommand1(some_argument, some_option):
        """And here we write a doc for particular command."""
        click.echo("GroupCommand1: argument: {}, option:{}".format(
            some_argument, some_option))

    @testgroup.command()
    @click.argument('some_argument', type=click.Path())
    @click.option('--some-option', default=False, is_flag=True,
                  help="Testing option in custom command.")
    def groupcommand2(some_argument, some_option):
        """This is another command docs."""
        click.echo("GroupCommand2: argument: {}, option:{}".format(
            some_argument, some_option))
In this example we created a new group called testgroup. We use that group in
the rest of the code to decorate new commands belonging to the group.
As usual, we have to register our function in the extension point
textx_commands inside pyproject.toml:
[project.entry-points.textx_commands]
testgroup = "cli:create_testgroup"
If MyProject is installed in the environment where textX is installed you'll
see that your command group is now accessible by the textx command:
$  textx
Usage: textx [OPTIONS] COMMAND [ARGS]...

Options:
  --debug  Debug/trace output.
  --help   Show this message and exit.

Commands:
  check        Check validity of meta-model and optionally model.
  testcommand  This command will be found as a sub-command of `textx`...
  testgroup    Here we write group explanation.
  visualize    Generate .dot file(s) from meta-model and optionally model.


$ textx testgroup
Usage: textx testgroup [OPTIONS] COMMAND [ARGS]...

  Here we write group explanation.

Options:
  --group-option  Some group option.
  --help          Show this message and exit.

Commands:
  groupcommand1  And here we write a doc for particular command.
  groupcommand2  This is another command docs.


$ textx testgroup groupcommand1 first_argument
GroupCommand1: argument: first_argument, option:False
For a full example please take a look at this test and this example test project.
For more information please see click documentation.
Registration and discovery
textX has an API for registration and discovery of languages and code
generators. This enable developing languages and generators for others to use by
simply installing from PyPI using pip.
textX utilizes a concept of extension
point to
declaratively specify the registration of language or generator. Each Python
project/package may in its pyproject.toml declare this extensions. Once a
Python package which declare the extension is installed in the environment, the
extension can be dynamically found.
To make it easier to find languages and generators on PyPI we recommend the following naming scheme for the Python packages that provide a single language or generator:
textx-lang-<language name>- for language package (e.g.textx-lang-entity)textx-gen-<source language>-<target language>- for generator package (e.g.textx-gen-entity-java)
With this scheme in place searching PyPI for all languages or generators can be
easily achieved by pip search command (e.g. pip search textx-lang to find
all languages).
textX languages
textX language consists of a meta-model which holds information of all language concepts and their relations (a.k.a. Abstract syntax) as well as a parser which knows how to transform textual representation of a language (a.k.a. Concrete syntax) to a model which conforms to the meta-model.
Also, each language has its unique name, a short one-line description and a file name pattern for recognizing files that contains textual representation of its models.
Registering a new language
To register a new language first you have to create an instance of
LanguageDesc class (or its subclass) providing the name of the language, the
file pattern of files using the language (e.g. *.ent), the description of the
language and finally a callable that should be called to get the instance of the
language meta-model. Alternatively, you can provide the instance of the
meta-model instead of the callable.
For example:
from textx import LanguageDesc

def entity_metamodel():
    # Some code that constructs and return the language meta-model
    # E.g. call to metamodel_from_file

entity_lang = LanguageDesc('entity',
                           pattern='*.ent',
                           description='Entity-relationship language',
                           metamodel=entity_metamodel)
The next step is to make this language discoverable by textX. To do this we have
to register our entity_lang object in the pyproject.toml entry point named
textx_languages.
[project.entry-points.textx_languages]
entity = "entity.metamodel:entity_lang"
In this example entity.metamodel is the Python module where entity_lang is defined.
When you install this project textX will discover your language and offer it through registration API (see bellow).
As a convenience there is a language decorator that makes creating an instance
of LanguageDesc more convenient. Use it to decorate meta-model callable and
provide the name and the file pattern as parameters. Docstring of the decorated
function will be used as a language description.
The equivalent of the previous definition using the language decorator would
be:
from textx import language

@language('entity', '*.ent')
def entity_lang():
    """
    Entity-relationship language
    """
    # Some code that constructs and return the language meta-model
    # E.g. call to metamodel_from_file
The pyproject.toml entry point registration would be the same.
Language name is its unique identifier. There must not exist two languages
with the same name. The name consists of alphanumerics, underscores (_) and
dashes (-). If you plan to publish your language on PyPI choose a name that is
higly unlikely to collide with other languages (e.g. by using some prefix,
mycompanyname-entity instead of just entity).
Listing languages
textX provides a core command list-languages that lists all registered
languages in the current environment. We eat our own dog food so even textX
grammar language is registered as a language using the same mechanism.
$ textx list-languages
txcl (*.txcl)         textx-gen-coloring    A language for syntax highlight definition.
textX (*.tx)          textX                 A meta-language for language definition
types-dsl (*.etype)   types-dsl             An example DSL for simple types definition
data-dsl (*.edata)    data-dsl              An example DSL for data definition
flow-dsl (*.eflow)    flow-dsl              An example DSL for data flow processing definition
The first column gives the language unique name and filename pattern, the second column is the Python project which registered the language and the third column is a short description.
You can get a reference to a registered language meta-model in your programs by
using the registration API metamodel_for_language call. For example:
from textx import metamodel_for_language
data_dsl_mm = metamodel_for_language('data-dsl')

model = data_dsl_mm.model_from_file('my_model.data')
textX generators
textX generators are callables which can transform any textX model to an
arbitrary (usually textual) representation. Similarly to languages, generators
can be registered and discovered. They can also be called either
programmatically or from CLI using textx command.
Registering a new generator
To register a new generator first you have to create an instance of
GeneratorDesc class (or its subclass) providing the name of the source
language, the name of the target language, a short one-line description of the
generator and finally a callable that should be called to perform code
generation. The callable is if the form:
def generator(metamodel, model, output_path, overwrite, debug, **custom_args)
where:
metamodel- is the meta-model of the source languagemodel- is the model for which the code generating is startedoutput_path- is the root folder path where the output should be storedoverwrite- a bool flag that tells us should we overwrite the target files if they existdebug- a bool flag which tells us if we are running in debug mode and should we produce more output**custom_args- additional generator-specific arguments. When the generator is called from the CLI this parameter will hold all other non-defaul switches. These switches will be validated against the list ofGeneratorParamas supplied by the last optional parameter ofGeneratorDesc.
For example:
from textx import GeneratorDesc

def entity_java_generator(metamodel, model, output_path, overwrite, debug, **custom_args)
    # Some code that perform generation

entity_java_generator = GeneratorDesc(
    language='entity',
    target='java'
    description='Entity-relationship to Java language generator',
    generator=entity_java_generator)
The next step is to make this generator discoverable by textX. To do this we
have to register our entity_java_generator object in the pyproject.toml
entry point named textx_generators.
[project.entry-points.textx_generators]
entity_java = "entity.generators:entity_java_generator"
You can also register generator programmatically using registration API. But
if you want your generator to be available to textx command you should use
pyproject.toml.
In this example entity.generators is the Python module where
entity_java_generator is defined.
When you install this project textX will discover your generator and offer it through registration API (see bellow).
As a convenience there is a generator decorator that makes creating an
instance of GeneratorDesc more convenient. Use it to decorate generator
callable and provide the name and the source and target language as parameters.
Docstring of the decorated function will be used as a generator description.
The equivalent of the previous definition using the generator decorator would
be:
from textx import generator

@generator('entity', 'java')
def entity_java_generator(metamodel, model, output_path, overwrite, debug, **custom_args)
    "Entity-relationship to Java language generator"
    # Some code that perform generation
The pyproject.toml would remain the same.
Here is an example of the generator of dot files from any textX model. This is
an actual code from textX.
@generator('any', 'dot')
def model_generate_dot(metamodel, model, output_path, overwrite, debug):
    "Generating dot visualizations from arbitrary models"

    input_file = model._tx_filename
    base_dir = output_path if output_path else os.path.dirname(input_file)
    base_name, _ = os.path.splitext(os.path.basename(input_file))
    output_file = os.path.abspath(
        os.path.join(base_dir, "{}.{}".format(base_name, 'dot')))
    if overwrite or not os.path.exists(output_file):
        click.echo('-> {}'.format(output_file))
        model_export(model, output_file)
        click.echo('   To convert to png run "dot -Tpng -O {}"'
                   .format(os.path.basename(output_file)))
    else:
        click.echo('-- Skipping: {}'.format(output_file))
If a generator has additional parameters they are described as follows:
from textx.registration import GeneratorParam

@generator("textX", "vscode", [
    GeneratorParam("project_name", "The name of the project used in vsix"),
    GeneratorParam("published", "The published of the vsix", False),
    GeneratorParam("version", "Version of the vsix", False),
    GeneratorParam("repository", "Git repository of the extension", False),
    GeneratorParam("description", "The description of the extension", False),
    GeneratorParam("skip_keywords", "Should keyword processing be done", False),
])
def vscode_gen(
    _metamodel,
    _model,
    output_path,
    overwrite,
    _debug,
    project_name,
    publisher="textX",
    version="0.1.0",
    repository="https://github.com/textX/textX-LS",
    description="textX DSL",
    skip_keywords=False
):
The GeneratorParam attributes include name, description, and the optional
mandatory flag, which defaults to True. These descriptions are used to
validate switches of the textx generate sub-command.
Listing generators
textX provides a core command list-generators that lists all registered
generators in the current environment.
$ textx list-generators
textX -> dot         textX               Generating dot visualizations from textX grammars
textX -> PlantUML    textX               Generating PlantUML visualizations from textX grammars
any -> dot           textX               Generating dot visualizations from arbitrary models
flow-dsl -> PlantUML flow-codegen        Generating PlantUML visualization from flow-dsl
The first column gives the generator identifier, the second column is the Python project which registered the generator and the third column is a short description.
Generators are identified by pair (<source language name>, <target language name>). The source language must be registered in the environment for the
generator to be able to parse the input. The target output is produced by the
generator itself so the target language doesn't have to registered.
We eat our own dog food so even textX visualization is
done as using the generator mechanism.
Calling a generator
You can get a reference to a generator by using the registration API. For
example generator_for_language_target call will return the generator for the
given source language name and target language name.
from textx import generator_for_language_target
robot_to_java = generator_for_language_target('robot', 'java')

robot_to_java(robot_mm, my_model)
If you are using @generator decorator and want to programmatically call the
generator do not call the decorated fuction as it is transformed to
GeneratorDesc instance. Instead, use generator_for_language_target call from
the registration API as described.
A more convenient way is to call the generator from the CLI. This is done using
the textX provided generate command.
To get a help on the command:
$ textx generate --help
Usage: textx generate [OPTIONS] MODEL_FILES...

  Run code generator on a provided model(s).

  For example::

  # Generate PlantUML output from .flow models
  textx generate mymodel.flow --target PlantUML

  # or with defined output folder
  textx generate mymodel.flow -o rendered_model/ --target PlantUML

  # To chose language by name and not by file pattern use --language
  textx generate *.flow --language flow --target PlantUML

  # Use --overwrite to overwrite target files
  textx generate mymodel.flow --target PlantUML --overwrite

  # In all above cases PlantUML generator must be registered, i.e.:
  $ textx list-generators
  flow-dsl -> PlantUML  Generating PlantUML visualization from flow-dsl

  # If the source language is not registered you can use the .tx grammar
  # file for parsing but the language name used will be `any`.
  textx generate --grammar Flow.tx --target dot mymodel.flow

Options:
  -o, --output-path PATH  The output to generate to. Default = same as input.
  --language TEXT         A name of the language model conforms to. Deduced
                          from file name if not given.
  --target TEXT           Target output format.  [required]
  --overwrite             Should overwrite output files if exist.
  --grammar TEXT          A file name of the grammar used as a meta-model.
  -i, --ignore-case       Case-insensitive model parsing. Used only if
                          "grammar" is provided.
  --help                  Show this message and exit.
You can pass arbitrary parameters to the generate command. These parameters
will get collected and will be made available as kwargs to the generator
function call.
For example:
textx generate mymodel.flow --target mytarget --overwrite --meaning_of_life 42
Your generator function:
@generator('flow', 'mytarget')
def flow_mytarget_generator(metamodel, model, output_path, overwrite, debug, **kwargs):
    ... kwargs has meaning_of_life param
gets meaning_of_life param with value 42 in kwargs.
If you have model parameters
defined on a meta-model
then any parameter passed to the generator that is registered on the meta-model
will be available as model._tx_model_params and can be used e.g. in model
processors.
Registration API
Language registration API
All classes and functions documented here are directly importable from textx module.
-
LanguageDesc- a class used as a structure to hold language meta-dataAttributes:
name- a unique language namepattern- a file name pattern used to recognized files containing the language modeldescription- a short one-line description of the languagemetamodel- callable that is called to get the meta-model or the instance of the meta-model
-
language_description(language_name)- return an instance ofLanguageDescgiven the language name -
language_descriptions()- return a dict oflanguage name->LanguageDescinstances -
register_language(language_desc_or_name, pattern=None, description='', metamodel=None)- programmatically register language by either providing an instance ofLanguageDescas the first parameter or providing separate parameters -
clear_language_registrations()- deletes all languages registered programmatically. Note: languages registered throughpyproject.tomlwon't be removed -
metamodel_for_language(language_name, **kwargs)- returns a meta-model for the given language name.kwargsare additional keyword arguments passed to meta-model factory callable, similarly tometamodel_from_str/file. -
language_for_file(file_name_or_pattern)- returns an instance ofLanguageDescfor the given file name or file name pattern. RaisesTextXRegistrationErrorif no language or multiple languages can parse the given file -
languages_for_file(file_name_or_pattern)- returns a list ofLanguageDescfor the given file name or file name pattern -
metamodel_for_file(file_name_or_pattern, **kwargs)- returns a language meta-model for a language that can parse the given file name or file name pattern.kwargsare additional keyword arguments passed to meta-model factory callable, similarly tometamodel_from_str/file. RaisesTextXRegistrationErrorif no language or multiple languages can parse the given file -
metamodels_for_file(file_name_or_pattern)- returns a list of meta-models for languages that can parse the given file name or file pattern -
language- a decorator used for language registration
Meta-model instances are cached with a given kwargs so the same instance can
be retrieved in further calls without giving kwargs. Whenever kwargs is
given in metamodel_for_file/language call, a brand new meta-model will be
created and cached for further use.
Generator registration API
-
GeneratorDesc- a class used as a structure to hold generator meta-dataAttributes:
name- a unique language namepattern- a file name pattern used to recognized files containing the language modeldescription- a short one-line description of the languagemetamodel- callable that is called to get the meta-model or the instance of the meta-model
-
generator_description(language_name, target_name, any_permitted=False)- return an instance ofGeneratorDescwith the given language and target. Ifany_permittedisTrueallow for returning generator for the same target and the source languageanyas a fallback. -
generator_descriptions()- return a dict of dicts where the first key is the source language name in lowercase and the second key is the target language name in lowercase. Values areGeneratorDescinstances. -
generator_for_language_target(language_name, target_name, any_permitted=False)- returns generator callable for the given language source and target. Ifany_permittedisTrueallow for returning generator for the same target and the source languageanyas a fallback. -
register_generator(generator_desc_or_language, target=None, description='', generator=None)- programmatically register generator by either providing an instance ofGeneratorDescas the first parameter or providing separate parameters -
clear_generator_registrations- deletes all generators registered programmatically. Note: generators registered throughpyproject.tomlwon't be removed -
generator- a decorator used for generator registration
Visualization
A meta-model, model and parse-tree can be exported to dot files (GraphViz) for
visualization. Module textx.export contains functions metamodel_export and
model_export that can export meta-model and model to dot files respectively.
But, it is usually more convenient to produce visualization using the textx
command.
If debugging is enabled, meta-model, model and parse trees will automatically get exported to dot.
Dot files can be viewed by dot viewers. There are quite a few dot viewers freely available (e.g. xdot, ZGRViewer).
Alternatively, dot files can be converted to image formats using dot command.
For more info see this SO
thread.
In addition to GraphViz we also support PlantUML as target for our exports
(see textx command/tool). You can copy-paste the exported
file content online on the PlantUML website to visualize it. The PlantUML Tool
is a JAR file (Java) which runs on various platforms. Many Linux distributions
have this tool included (e.g. Ubuntu: apt install platuml).
Producing (meta)model visualizations using the textx command
This section describes how to use textx command and registered
generators to produce model and meta-model visualizations.
Visualizations of models and meta-models are implemented by registering
generators from textX (for meta-models) or any (for all models) to dot or
PlantUML file format. Several of these generators are provided by textX. You
can list them by list-generators command:
$ textx list-generators
textX -> dot         textX               Generating dot visualizations from textX grammars
textX -> PlantUML    textX               Generating PlantUML visualizations from textX grammars
any -> dot           textX               Generating dot visualizations from arbitrary models
flow-dsl -> PlantUML flow-codegen        Generating PlantUML visualization from flow-dsl
You see that we have two generators from textX language (i.e. textX grammar
language) registered by the textX project. The first as a target uses dot
and the second uses PlantUML. These generators will produce dot (part of
GraphViz) or pu (PlantUML) file respectively.
Also, you can see that there is any -> dot generator. This generator can be
applied to any model and will produce dot output.
You can also see in this example that we have a specific visualization for
language flow-dsl that produces PlantUML code. You can register visualizers
for your own language by registering a generator from your language to some
output that represents visual rendering. Also, you could provide rendering to
some different format for all models (any) or for textX grammars. See the
registration/discovery feature on how to do that.
Generators that produce visualization are by no means different from any other generators (e.g. those that would produce Java or Python code).
Here is an example on how to produce the same visualization described in section Visualization (see the robot example).
$ textx generate robot.tx --target dot
Generating dot target from models:
/home/igor/repos/textX/textX/examples/robot/robot.tx
-> /home/igor/repos/textX/textX/examples/robot/robot.dot
   To convert to png run "dot -Tpng -O robot.dot"
Now you can view dot file using some of available viewers. For example, if you
install xdot:
$ xdot robot.dot
or convert it to some other graphical format (GraphViz is needed):
$ dot -Tpng -O robot.dot
and you will get robot.dot.png that looks like this:
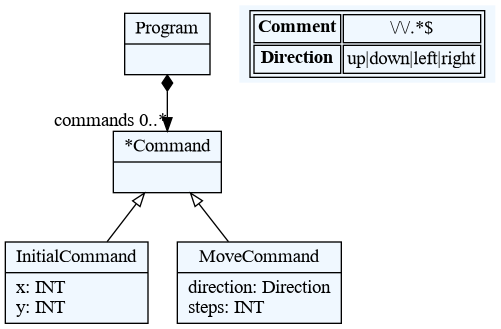
You can also generate PlantUML output from the grammar files:
$ textx generate robot.tx --target plantuml
Generating plantuml target from models:
/home/igor/repos/textX/textX/examples/robot/robot.tx
-> /home/igor/repos/textX/textX/examples/robot/robot.pu
To convert to png run 'plantuml /home/igor/repos/textX/textX/examples/robot/robot.pu'
This will produce file robot.pu. Now convert it to robot.png by (PlantUML
must be installed and accessible on path):
$ plantuml robot.pu
The produced robot.png image will look like this:
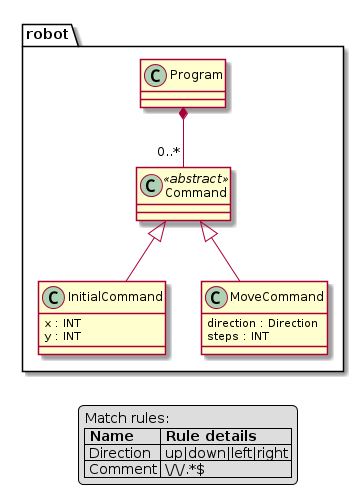
PlantUML generator accepts additional parameter linetype which controls
the style of lines in the diagram. Possible values are ortho and
polyline. For example:
$ textx generate robot.tx --target plantuml --linetype ortho
Similarly you can generate output from any model. For example:
$ textx generate program.rbt --grammar robot.tx --target dot
Generating dot target from models:
/home/igor/repos/textX/textX/examples/robot/program.rbt
-> /home/igor/repos/textX/textX/examples/robot/program.dot
   To convert to png run "dot -Tpng -O program.dot"
In this example we had to supply --grammar option to generate command as the
robot language is not registered by the registration API.
If we had the robot language registered, meta-model could be discovered by the
file extension.
We could as usual visualize the dot file by some of the available viewers or
transform it to png format. The produced image will look like this:

PlantUML output is not yet available for model files.
Visualize meta-models programmatically
To visualize a meta-model programmatically do (see Entity example):
from textx import metamodel_from_file
from textx.export import metamodel_export

entity_mm = metamodel_from_file('entity.tx')

metamodel_export(entity_mm, 'entity.dot')
entity.dot file will be created. You can visualize this file by using various
dot viewers or convert it to various image formats using the dot tool.
$ dot -Tpng -O entity.dot
The following image is generated:

Alternatively, you can also specify an alternative renderer to export your meta model for the PlantUML tool.
from textx import metamodel_from_file
from textx.export import metamodel_export, PlantUmlRenderer

entity_mm = metamodel_from_file('entity.tx')

metamodel_export(entity_mm, 'entity.pu',renderer=PlantUmlRenderer())
entity.pu file will be created. You can convert it to various image formats
using the plantuml tool.
$ plantuml -Tpng entity.pu
The following image is generated:
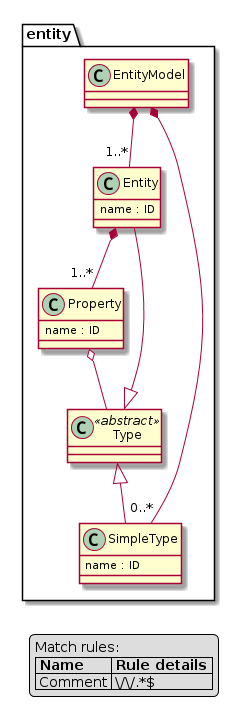
Visualize models programmatically
Similarly to meta-model visualization, you can also visualize your models (see Entity example).
from textx.export import model_export

person_model = entity_mm.model_from_file('person.ent')

model_export(person_model, 'person.dot')
Convert this dot file to png with:
$ dot -Tpng -O person.dot
The following image is generated:
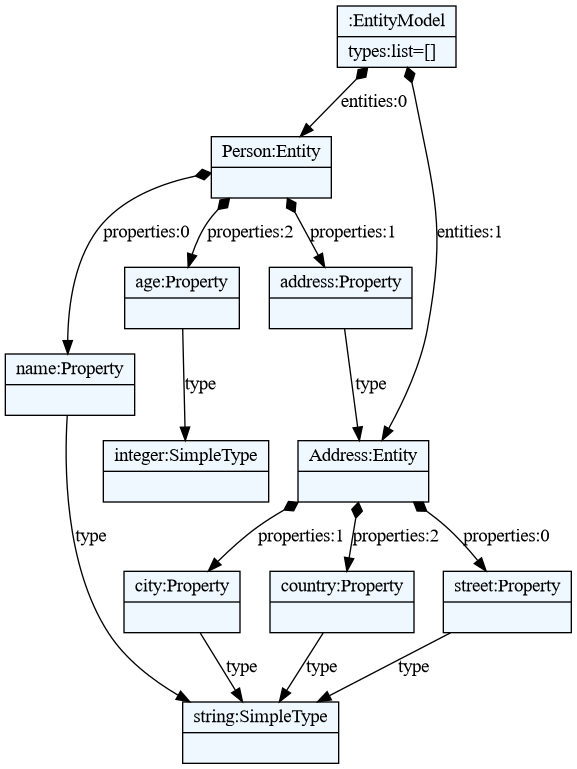
textX projects scaffolding
startpoject command is provided by
textX-dev project. You have to either
install this project or install textX optional dev dependencies with pip install textX[dev].
In case you are developing many textX languages and generators and would like to
do some organization we have provided a textX command startproject that will
generate either a language or a generator project with all necessary project files
to get you started quickly.
To scaffold a project just run:
textx startproject <folder>
You will be asked several questions and then the project will be generated in the given folder. After that you can:
pip install -e <folder>
to install your project in development mode.
Your language/generator will be registered in the project setup.cfg file and
visible to textX which you can verify with:
textx list-languages
for language project or
textx list-generators
for generator project.
Answers to questions are cached in your home folder so the next time you run scaffolding you don't have to type all the answers. If the default provided answer is OK just press Enter.
Check the textX registration and discovery for details on
list-generators and list-languages commands and recommended naming for
language/generator textX projects.
HowTos
Modeling hierarchical data structures: referencing attributes
The idea is to model a structure with attributes (which may again be structures).
struct A {
    val x
}
struct B {
    val a: A
}
struct C {
    val b: B
    val a: A
}
struct D {
    val c: C
    val b1: B
    val a: A
}

instance d: D
reference d.c.b.a.x
reference d.b1.a.x
Modeling classes and objects: class inheritance
Inherited attributes or methods can be accumulated with the textx.scoping.providers.ExtRelativeName scope provider:
-
Unittest (classes with pseudo inherited methods) tests/functional/test_scoping/test_metamodel_provider3.py
- test_metamodel_provider_advanced_test3_inheritance2
- test_metamodel_provider_advanced_test3_diamond
-
Unittest (components with inherited slots) tests/functional/test_scoping/test_inheritance.py
Modeling Wiki-like texts with references inside
The idea is to model a string with an arbitrary content and links to other objects (the links are encoded with a special symbol, e.g. "[myref]" or - like in the exmample referenced below "@[myref]"):
ENTRY Hello:    """a way to say hello\@mail (see @[Hi])"""
ENTRY Hi:       """another way to say hello (see @[Hello])"""
ENTRY Salut:    """french "hello" (@[Hello]@[Hi]@[Bonjour]@[Salut]@[Hallo])"""
ENTRY Hallo:    """german way to say hello (see ""@[Hello]"")"""
ENTRY Bonjour:  """another french "\@@[Hello]", see @[Salut]"""
ENTRY NoLink:   """Just text"""
ENTRY Empty:    """"""
Referencing a JSON database from within a textX model
Here, we link a textX model with a non textX database (could be any database or data structure available in python). If you have, e.g., a DOORS binding, you could also reference such information sources.
-
JSON-File "data.json":
{ "name": "pierre", "gender": "male" } -
TextX-model:
import "data.json" as data access A1 data.name access A2 data.gender -
Unittest tests/functional/test_scoping/test_reference_to_nontextx_attribute.py
Referencing global data using full qualified names
-
Example model:
package P1 { class Part1 { } } package P2 { class Part2 { attr C2 rec; } class C2 { attr P1.Part1 p1; attr Part2 p2a; attr P2.Part2 p2b; } } -
Unittest tests/functional/test_scoping/test_full_qualified_name.py
Multi-file models
-
Unittest (global import) tests/functional/test_scoping/test_global_import_modules.py
-
Unittest (explicit import, "importURI") tests/functional/test_scoping/test_import_module.py
-
Unittest (explicit import, "importURI" with custom search path) tests/functional/test_scoping/test_import_module_search_path_issue66.py
Multi-metamodel multi-file models
Here, we focus on referencing model elements from models based on other textX meta models. These other meta models are typically imported from other python modules (e.g. deployed separately).
In the example referenced below, we simulate three modules with three classes in the unittest. Each class take the role of one module and defines one concrete DSL. These DLS reference each other.
-
Model example (types.type) - "Type"-DSL
type int type string -
Model example (data_structures.data) - "Data"-DSL
#include "types.type" data Point { x: int y: int} data City { name: string } data Population { count: int} -
Model example (data_flow.flow) - "Flow"-DSL
#include "data_structures.data" #include "types.type" // double include, loaded 1x only algo A1 : Point -> City algo A2 : City -> Population connect A1 -> A2 -
Model example (data_flow.flow) - "Flow"-DSL with validation error
#include "data_structures.data" algo A1 : Point -> City algo A2 : City -> Population connect A2 -> A1 // Error, must be A1 -> A2 -
Unittest tests/functional/test_metamodel/test_multi_metamodel_refs.py
Enable and distinguish float and int values for attributes
-
Model text:
x1 = 1 x2 = -1 y1 = 1.0 y2 = 1.1e-2 y3 = -1.1e+2 -
Unittest tests/functional/examples/test_modeling_float_int_variables.py
Parsing structures inside arbitrary surrounding text
See this StackOverflow question.
Optimizing grammar performance
When it comes to parsing very large files with textX, the performance issues may arise. In certain cases, a good performance improvement can be achieved by optimizing the grammar.
Investigating the grammar with the parse trace option enabled (debug=true)
helps to reveal the excessive backtrackings (unsuccessful matches) that are
essentially the wasted computations. By investigating these backtrackings,
valuable clues can be obtained regarding possible inefficiencies in the
grammar design.
Known optimization techniques:
-
Reorder OrderedChoice to put first those members that occur more often in inputs.
-
If a grammar has a hot path that is called out very often and this path contains negative assertions (see this example), these negative assertions can be optimized by merging them all together in a single regex. Regex engine is implemented in C and is much faster to handle the negative assertions in one go compared to when the negative matching is done by Arpeggio on the Python level.
Caching parsed content to speed up processing
Parsing a single text file with textX can be fast. However, when dealing with multiple files that need to be re-parsed every time a program is invoked, it is worth considering the option of caching the parsed content.
One straightforward solution, using Python, involves utilizing Python's pickle module. After running a textX job, a set of Python objects is created based on the textX grammar. The Pickle module allows storing these objects in a file on the file system. Consequently, when the program is executed again, instead of parsing the textX grammar from scratch, the program can efficiently recreate the Python objects from the cached file.
To ensure that the cache remains valid, the modification date of the original text file can be compared with that of the cached file. If the cached file is found to be older than the original text file, it indicates that the textX parser needs to be called again to obtain the latest result and subsequently update the cached file.
textX Scoping
Motivation and Introduction to Scoping
Assume a grammar with references as in the following example (grammar snippet).
MyAttribute:
        ref=[MyInterface:FQN] name=ID ';'
;
The scope provider is responsible for the reference resolution of such a reference.
The default behavior (default scope provider) is looking for the referenced name globally (not taking any nested model structures into account, such as nested model-packages, model-namespaces or similar).
Other scope providers will take namespaces into account, support references to parts of the model stored in different files or even models defined by other metamodels (imported into the current metamodel). Moreover, scope providers exist that allow to reference model elements relative to other referenced model elements. For example, this can be a referenced method defined in a referenced class of an instance (with a metamodel defining classes, methods and instances of classes).
Usage
The scope providers are registered with a metamodel and can be bound to specific attributes of grammar rules:
- e.g.,
my_meta_model.register_scope_providers({"*.*": scoping.providers.FQN()})boundsFQNprovider to all attributes of all grammar rules due to*.* - or:
my_meta_model.register_scope_providers({"MyAttribute.ref": scoping.providers.FQN()})boundsFQNprovider to attributerefof grammar ruleMyAttribute - or:
my_meta_model.register_scope_providers({"*.ref": scoping.providers.FQN()})boundsFQNprovider torefattribute of all grammar rules. - or:
my_meta_model.register_scope_providers({"MyAttribute.*": scoping.providers.FQN()})boundsFQNprovider to all attributes ofMyAttributegrammar rule
Example (from tests/test_scoping/test_local_scope.py):
# Grammar snippet (Components.tx)
Component:
    'component' name=ID ('extends' extends+=[Component:FQN][','])? '{'
        slots*=Slot
    '}'
;
Slot: SlotIn|SlotOut;
# ...
Instance:
    'instance' name=ID ':' component=[Component:FQN] ;
Connection:
    'connect'
      from_inst=[Instance:ID] '.' from_port=[SlotOut:ID]
    'to'
      to_inst=[Instance:ID] '.' to_port=[SlotIn:ID]
;
# Python snippet
my_meta_model = metamodel_from_file(
    os.path.join(abspath(dirname(__file__)), 'components_model1', 'Components.tx')

my_meta_model.register_scope_providers({
    "*.*": scoping_providers.FQN(),
    "Connection.from_port": scoping_providers.RelativeName(
        "from_inst.component.slots"),
    "Connection.to_port": scoping_providers.RelativeName(
        "to_inst.component.slots"),
})
This example selects the fully qualified name provider as default provider
("*.*"). Moreover, for special attributes of a Connection a relative name
lookup is specified: here the path from the rule Connection containing the
attribute of interest (e.g. Connection.from_port) to the referenced element is
specified (the slot contained in from_inst.component.slots). Since this
attribute is a list, the list is searched to find the referenced name.
Special rule selections (e.g., Connection.from_port) are preferred to wildcard
selection (e.e, "*.*").
Scope Providers defined in Module "textx.scoping.providers"
The scope provider implementations presented here assume that the name
attribute of named elements has a string type (e.g. ´name=ID´).
We provide some standard scope providers:
-
textx.scoping.providers.PlainName: This is the default provider of textX. It implements global naming within one model (model file/string) without namespaces. -
textx.scoping.providers.FQN: This is a provider similar to Java or Xtext name loopup within one model (model file/string). Example: see tests/test_scoping/test_full_qualified_name.py.A central feature of this scope provider is, that it traverses the model tree and searches for a matching sequence of named objects (objects with an attribute
namematching parts of the full qualified name separated by dots). You can also provide a callback (scope_redirection_logic) to specify that certain named objects are not searched recursively, but are replaced by a list of objects instead, which are searched in place of the current object. With this feature you can create, e.g., namespace/package aliases in your language. You can also activate a python like module import behavior for your language (withtextx.scoping.providers.FQNImportURI), which is based on this callback. Example: see tests/functional/regressions/test_issue103_python_like_import.py.package p1 { package p2 { class a {}; } } using p1.p2 as main var x = new p1.p2.a() var y = new main.a()Except in the context of the
scope_redirection_logic(see above), the FQN does not take Postponed (unresolved) references into account. The reason is that this would create a much more complex decision logic to decide which reference needs to be resolved first. The purpose of the FQN is to identify direct instances of model objects, and no references. -
textx.scoping.providers.ImportURI: This a provider which allows to load additional modules for lookup. You need to define a rule with an attributeimportURIas string (like in Xtext). This string is then used to load other models. Moreover, you need to provide another scope provider to manage the concrete lookup, e.g., thescope_provider_plain_namesor thescope_provider_fully_qualified_names. Model objects formed by the rules with animportURIattribute get an additional attribute_tx_loaded_modelswhich is a list of the loaded models by this rule instance. Example: see tests/test_scoping/test_import_module.py.FQNImportURI(decorated scope provider)PlainNameImportURI(decorated scope provider)
You can use globbing (e.g.
import "*.data") with the ImportURI feature. This is implemented via the Pythonglobmodule. Arguments can be passed to theglob.globfunction (glob_args), e.g., to enable recursive globbing. Alternatively, you can also specify a list of search directories. In this case globbing is not allowed and is disabled (reason: it is unclear if the user wants to glob over all search path entries or to stop after the first match). Example: see tests/test_scoping/test_import_module_search_path_issue66.py. -
textx.scoping.providers.GlobalRepo: This is a provider where you initially need to specifiy the model files to be loaded and used for lookup. Like forImportURIyou need to provide another scope provider for the concrete lookup. Example: see tests/test_scoping/test_global_import_modules.py.-
textx.scoping.providers.FQNGlobalRepo(decorated scope provider)Here, you can also activate the "importAs" feature to allow to make imported models not visible in your root namespace, but related to a named importURI element (tests/test_scoping/importURI_variations/test_importURI_variations.py)
You can also transform the importURI attribute to a filename: see (tests/test_scoping/importURI_variations/test_importURI_variations.py.
-
textx.scoping.providers.PlainNameGlobalRepo(decorated scope provider)
-
-
textx.scoping.providers.RelativeName: This is a scope provider to resolve relative lookups: e.g., model-methods of a model-instance, defined by the class associated with the model-instance. Typically, another reference (the reference to the model-class of a model-instance) is used to determine the concrete referenced object (e.g. the model-method, owned by a model-class). Example: see tests/test_scoping/test_local_scope.py. -
textx.scoping.providers.ExtRelativeName: The same asRelativeNameallowing to model inheritance or chained lookups. Example: see tests/test_scoping/test_local_scope.py.
Note on Uniqueness of Model Elements (global repository)
Two different models created using one single meta-model (not using a scope
provider like GlobalRepo, but by directly loading the models from file) have
different instances of the same model elements. If you need two such models to
share their model element instances, you can specify this, while creating the
meta model (global_repository=True or
global_repository=instance_of_a_global_repo). Then, the meta model will store
an own instance of a GlobalModelRepository as a base for all loaded models.
Model elements in models including other parts of the model (possibly circular) have unique model elements (no double instances).
Examples see tests/test_scoping/test_import_module.py.
Included model retrieval
When a model includes or references other model (model files), the scope
providers in textx.scoping.providers use the field _tx_model_repository
of the model object to keep track of the included models.
- You can get a list of all included model objects of a model
and the model itself with
textx.scoping.providers.get_all_models_including_attached_models. - You can check if a model file is included by a model with
textx.scoping.providers.is_file_included_by_model.
Builtin models
Similarly to builtin objects that are searched
by their names, as a fallback you can provide model repository using
builtin_models parameter during meta-model construction. These models will be
searched by scoping providers based on ImportURI scoping provider after
searching into a local model and all loaded models fails.
This is handy to provide builtin models of the language that are pre-loaded and don't need to be imported by each user model.
Here is a full example that demonstrates this feature:
from textx import metamodel_from_str, metamodel_for_language, register_language
from textx.scoping import ModelRepository

types_mm = metamodel_from_str(r'''
Model: types+=BaseType;
BaseType: 'type' name=ID;
''')

# We register `types` language to be available by `reference`
# statement in the main meta-model
register_language('types', '*.type', 'Simple types language', types_mm)

# Now in the main meta-model we use `references` to access the
# type language. We also use RREL for `Property.type` (+m:types) to
# specify where instances of `BaseType` can be found.
entity_mm_str = r'''
reference types as t
Model: entities+=Entity;
Entity: 'entity' name=ID '{'
              properties*=Property
        '}'
;
Property: name=ID ':' type=[t.BaseType:ID|+m:types];
'''

# Get `types` language meta-model
types_mm = metamodel_for_language('types')

builtin_models = ModelRepository()

# Construct types model and add it to the repository.
# We instantiate the types model with two BaseType instances: `int` and `bool`
builtin_models.add_model(types_mm.model_from_str('type int type bool'))

# BaseType object `int` and `bool` will now be available to the
# entity meta-model. Standard RREL search mechanism will be used to find the
# referenced model object
entity_mm = metamodel_from_str(entity_mm_str, builtin_models=builtin_models)

# In this model `bool` type is accessible despite not being explicitly imported.
model = entity_mm.model_from_str(r'''
entity First {
    first : bool
}
''')

assert model.entities[0].properties[0].type.name == 'bool'
assert model.entities[0].properties[0].type.__class__.__name__ == 'BaseType'
''')
Technical aspects and implementation details
The scope providers are Python callables accepting obj, attr, obj_ref:
obj: the object representing the start of the search (e.g., a rule, likeMyAttributein the example above, or the model)attr: a reference to the attribute (e.g.refin the first example above)obj_ref: atextx.model.ObjCrossRef- the reference to be resolved
The scope provider return the referenced object (e.g. a MyInterface object in
the example illustrated in the Motivation and Introduction above (or None if
nothing is found; or a Postponed object, see below).
The scope provider is responsible to check the type and throw a
TextXSemanticError if the type is not OK.
Scope providers shall be stateless or have unmodifiable state after construction: this means they should allow to be reused for different models (created using the same meta-model) without interacting with each other. This means, they must save their state in the corresponding model, if they need to store data (e.g., if they load additional models from files during name resolution, they are not allowed to store them inside the scope provider.
Models with references being resolved have a temporary attribute
_tx_reference_resolver of type ReferenceResolver. This object can be used to
resolve the object. It contains information, such as the parser in charge for
the model (file) being processed.
Scope providers as normal functions (def <name>(...):...), not accessing
global data, are safe per se. The reason to be stateless, is that no side
effects (beside, e.g., loading other models) should influence the name lookup.
The state of model resolution should mainly consist of models already loaded.
These models are stored in a GlobalModelRepository class. This class (if
required) is stored in the model. An included model loaded from another
including model "inherits" the part of the GlobalModelRepository representing
all loaded models. This is done to (a) cache already loaded models and (b)
guarantee, that every referenced model element is instantiated exactly once.
Even in the case of circular inclusions.
Scope providers may return an object of type Postponed, if they depend on
another event to happen first. This event is typically the resolution of another
reference. The resolution process will repeat multiple times over all unresolved
references to be resolved until all references are resolved or no progress
regarding the resolution is observed. In the latter case an error is raised. The
control flow responsibility of the resolution process is allocated to the
model.py module.
Using the scope provider to modify a model
Model creation by the metamodel (loading the model) is divided into a set of strictly ordered activities. Understanding that order makes it clear where in the metamodel and its configuration (e.g., scope providers or object processors) it is allowed to modify the model itself and what has to be taken into account.
The following image sketches these ordered activities:
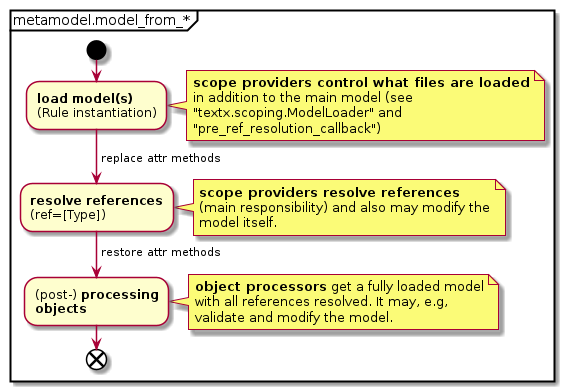
The image illustrates that, while resolving references, all directly modeled objects are already loaded and instantiated. Scoping takes place after the model is completely parsed. Thus, while resolving references you can rely on the assumption that all model elements already exist.
It also shows, that objects processors kick in when all references are resolved. That means that no references are resolved any more after or while the first object processor has been executed. One exception is when calling object processors for match rules (e.g. regular expressions or rules like 'ID'): these processors are called bottom up during model construction. Those object processors should generally be a very simple, usually just a type conversions so they don't need a fully constructed model. Other object processors (i.e. those operating on common rules) are called, as depicted above, on a constructed model, in bottom up fashion.
While resolving references, user classes have modified attr-methods
(__setattr__, __getattr__, __delattr__, and __getattribute__) in order
to enable user classes with modified/restricted attribute access, like classes
employing __slots__ (see Custom classes).
Use case: reference data in non-textx models
If you want to reference an element not directly modelled (instantiated), you need to
instantiate or load this element or information somewhere. This information can be,
e.g., information from a non-textx model, such as a JSON file
(see: test_reference_to_nontextx_attribute.py).
Since you need to resolve a reference (e.g. to an [OBJECT] in the
given example), you cannot rely on object processors, since they are executed
after reference resolution. Thus, scope providers need to take care of
that (e.g., take care of loading the JSON data).
Use case: reference data "defined by references"
You may have the use case, that you want to define/instantiate objects by referencing them (on the fly). This may happen, if your meta model allows to define a model element by referencing it (like PlantUML is doing for, e.g., classes). In that case your scope provider creates (invents) model elements.
If you then require to reference these model elements "defined by
a reference" by another "non-inventing reference",
you must take into account that these elements
may have not yet been created. This can be achieved in the same
way as handling unresolved references in a scope provider (with the
Postponed mechanism). This use case was motivated by
#167.
An example of such a meta model is given in tests/test_model_modification_through_scoping.py: Here you can
- define Persons explicitly (existence) and
- reference two persons which know each other (relationship). Moreover, referencing a nonexistent persons (all person explicitly defined by the grammar have been created at the time of reference resolving) will create an additional (new) person (and, thus, modify the model).
In an extension of the grammar we then also allow
-
to greet persons. This also happens by referencing a person (like for the "knows"-relationship). But this time, nonexistent persons shall not be created, but should yield a referencing error.
Implementation: Since it is unclear if a nonexistent person may be created by a not yet resolved "knows"-relationship reference, we have to postpone the resolution of a failed greeting (return
Postponed). The reference resolution mechanism will detect if a state is reached with only postponed references and will then raise an error, as expected.
Reference resolving expression language (RREL)
RREL allows to specify scope provider (lookup) specification in the grammar itself (grammar example and an example test).
The idea is to support all current builtin scoping providers (e.g., FQN,
RelativeName etc.; see scoping) while the user would have to
resort to Python only to support some very specific cases or referring to models
not handled by textX.
A RREL expression is written as a third part of the textX link rule reference.
For example:
Attribute: 'attr' ref=[Class:FQN|^packages*.classes] name=ID ';';
This grammar rule has a ref attribute which is a reference to the Class
rule. This is a link rule reference as it is enclosed inside of square brackets.
It consists of three parts where first two parts are separated by : while the
second and the third are separated by |. The first part defines the target
object type or its grammar rule. The second part defines what will parser match
at the place of the reference. It would be a fully qualified name of the target
object (thus FQN). The third part of the reference is RREL expression
(^packages*.classes). Second and third part of the reference are optional. If
second part is not given ID is assumed. If RREL expression is not given the
default resolver, which search the reference in the global scope, will be used.
Each reference in the model, by default, forms a dot separated name, which is
matched by the second part of the link rule reference in the grammar, where a
plain ID is just a special case. For example, a reference could be
package1.component4 or just component4. We could further generalize this by
saying that a reference is a sequence of names where a plain ID is just a
sequence of length 1. It doesn't have to be dot separated. A user could provide
a custom match rule (like FQN in the above example) and a match processor to
convert the matched string to a sequence of names. There is also the possibility
to define the separator sequence (by default a dot), as demonstrated in
sub-section "RREL reference name deduction"
bellow.
For reference resolving as an input we have:
- A dot separated name matched by the parser, where ID is a special case
- A RREL expression
We evaluate RREL expression using the name in the process and we yield referenced object or an error.
RREL operators
Reference resolving expression language (RREL) consists of several operators (see test):
-
.Dot navigation. Search for the attribute in the current AST context. Can be used for navigation up the parent chain, e.g..is this object,..is parent,...is a parent of a parent. If the expression starts with a.than we have a relative path starting from the current AST context. Otherwise we have an absolute path starting from the root of the model unless^is used (see below). For example,.a.bmeans search foraattribute at the current level (.) and than search forbattribute. Expressiona.bwould search starting from the root of the model. -
parent(TYPE)- navigate up the parent chain until the exact type is found. -
~This is a marker applied to a path element to inform resolver that the current collection should not be searched by the current name part but that all elements should be processed. For example, to search for a method in the inheritance hierarchy one would write~extends*.methodswhich (due to*, see below) first searchesmethodscollection of the current context object, if not found, all elements of the currentextendscollection are iterated in the order of defintion without consuming name part, and then name would be searched in themethodscollection of each object from theextendscollection. If not found*would expandextendstoextends.extendsif possible and the search would continue. -
'name-value'~The~operator takes an additional optional string to indicate that the part of the name is not consumed, but is expected to be the value indicated by the passed string:'myname'~myattributemeans follow attributemyattribute, if it is named'myname'.The following example sketches parts of a meta-model, where the lookup rules indicate a fallback to some
types_collectionentry with the name'builtin'(of course such an object must be present to successfully resolve such references, e.g., by adding a builtin model with that information (see tests/test_scoping/test_rrel.py, test_rrel_with_fixed_string_in_navigation):Using: 'using' name=ID "=" type=[Type:ID|+m: ~active_types.types, // "regular lookup" 'builtin'~types_collection.types // "default lookup" - name "builtin" // hard coded in grammar ]; -
*- Repeat/expand. Used in expansion step to expand sub-expression by 0+ times. First expansion tried will be 0, then once, then twice etc. For example,~extends*.methodswould search inmethodscollection in the current context object for the current name part. If not found expansion of*would took place and we would search in~extends.methodsby iterating overextendscollection without consuming part name (due to~) and searching by ref. name part insidemethodscollection of each iterated object. The process would continue (i.e.~extends.~extends.methods...) until no more expansion is possible as we reach the end of inheritance chain. -
^- Bottom-up search. This operator specifies that the given path should be expanded bottom-up, up the parent chain. The search should start at the current AST context and go up the parent chain for the number of components in the current expanded path. Then the match should be tried. See the components example above using^inextends. For example,^a.b.cwould start from the current AST level and go to the parent of the parent, search there fora, then would search forbin the context of the previous AST search result, and finally would search for attributec.^is a marker applied to path search subexpression, i.e. it doesn't apply to the whole sequence (see below). -
,- Defines a sequence, i.e. a sequence of RREL expressions which should tried in order.
Priorities from highest to lowest: *, ., ,.
~ and ^ are regarded as markers, not operators.
RREL evaluation
Evaluation goes like this:
- Expand the expression. Expand
*starting from 0 times. - Match/navigate the expression (consume part names in the process)
- Repeat
The process stops when either:
- all possibilities are exhausted and we haven't find anything -> error.
- in
*we came to a situation where we consume all part names before we finished with the RREL expression -> error. - We have consumed all path name elements, finished with RREL expression and found the object. If the type is not the same as the type given in the grammar reference we report an error, else we found our object.
RREL reference name deduction
The name of a referenced object is transformed into a list of non-empty
name parts, which is processed by a RREL expression to navigate through the
model. Possible names are defined in the grammar, e.g. FQN in the
following example (used in rule Attribute to reference a model class:
Model:     packages*=Package;
Package:   'package' name=ID '{' classes*=Class '}';
Class:     'class' name=ID '{' attributes*=Attribute '}';
Attribute: 'attr' ref=[Class:FQN|^packages*.classes] name=ID ';';
Comment:   /#.*/;
FQN:       ID('.'ID)*;
The name of a reference (Attribute.ref) could then be,
e.g., P1.Part1 (the package P1 and the class Part1),
separated by a dot. The dot is the default separator
(if no other separator is specified).
package P1 {
    class Part1 {
    }
}
package P2 {
    class Part2 {
        attr C2 rec;
    }
    class C2 {
        attr P1.Part1 p1;
        attr Part2 p2a;
        attr P2.Part2 p2b;
    }
}
The match rule used to specify possible reference names (e.g., FQN)
can specify a separator used to split the reference name into individual
name parts. Use the rule parameter split, which must be a non-empty
string (e.g. split='/'; note that the match rule itself should produce
names, for which the given separator makes sense):
Model:          packages*=Package;
Package:        'package' name=ID '{' classes*=Class '}';
Class:          'class' name=ID '{' attributes*=Attribute '}';
Attribute:      'attr' ref=[Class:FQN|^packages*.classes] name=ID ';';
Comment:        /#.*/;
FQN[split='/']: ID('/'ID)*;  // separator split='/'
Then the RREL scope provider (using the match rule with the extra
rule parameter split) automatically uses the given split
character to process the name.
RREL and multi files model
Use the prefix +m: for an RREL expression to activate a multi file model
scope provider. Then, in case of no match, other loaded models are searched.
When using this extra prefix the importURI feature is activated
(see scoping and
grammar example).
Accessing the RREL 'path' of a resolved reference
Use the prefix +p: for an RREL expression to access the complete
path of named elements for a resolved reference. For that, the
resolved reference is represented by a proxy which is transparent
to the user is terms of attribute access and textx_instanceof
semantics.
The proxy (textx.scoping.rrel.ReferenceProxy) provides two extra
fields: _tx_obj and _tx_path. _tx_obj represent the
referenced object itself and _tx_path is a list with
all named elements traversed during scope resolution. The last
entry of the list is _tx_obj.
The following model shows how to employ the +p: flag and
is used in the unittest referenced for the following use case:
Model:
    structs+=Struct
    instances+=Instance
    references+=Reference;
Struct:
    'struct' name=ID '{' vals+=Val '}';
Val:
    'val' name=ID (':' type=[Struct])?;
Instance:
    'instance' name=ID (':' type=[Struct])?;
Reference:
    'reference' ref=[Val:FQN|+p:instances.~type.vals.(~type.vals)*];
FQN: ID ('.' ID)*;
The use case for that feature is that you sometimes need
to access all model elements specified in a model reference. Consider
a reference to a hierarchically modelled data element like in this
unittest example,
e.g. reference d.c.b.a.x:
struct A {
    val x
}
struct B {
    val a: A
}
struct C {
    val b: B
    val a: A
}
struct D {
    val c: C
    val b1: B
}
instance d: D
reference d.c.b.a.x
reference d.b1.a.x
In this example you need all referenced intermediate model elements to
accurately identify the modelled data for, e.g., code generation because
reference d.c.b.a.x is not distinguishable from
reference d.b1.a.x without the path
(both point to the field x in A).
Using RREL from Python code
RREL expression could be used during registration in place of scoping provider. For example:
my_meta_model.register_scope_providers({
        "*.*": scoping_providers.FQN(),
        "Connection.from_port": "from_inst.component.slots"  # RREL
        "Connection.to_port": "from_inst.component.slots"      # RREL
    })
RREL processing (internal)
RREL expression are parsed when the grammar is loaded and transformed to AST
consisting of RREL operator nodes (each node could be an instance of RREL
prefixed class, e.g RRELSequence). The expressions ASTs are stateless and thus
it is an important possibility to define the same expression for multiple
attributes by using wildcard as the same expression tree would be used for the
evaluation.
In the process of evaluation the root of the expression tree is given the sequence of part names and the current context which represent the parent object of the reference in the model AST. The evaluation is then carried out by recursive calls of the RREL AST nodes. Each node gets the AST context consisting of a collection of objects from the model and a current unconsumed part names collection, which are the result of the previous operation or, in the case of the root expression AST node, an initial input. Each operator object should return the next AST context and the unconsumed part of the name. At the end of the successful search AST context should be a single object and the names parts should be empty.
Multi meta-model support
There are different ways to combine meta models: (1) a meta model can use another meta model to compose its own structures (extending a meta model) or (2) a meta model can reference elements from another meta model. (3) Moreover, we also demonstrate, that we can combine textX metamodels with arbitrary non-textX metamodels/models available in python.
(1) Extending an existing meta model can be realized in textX by defining a grammar extending an existing grammar. All user classes, scope providers and processors must be manually added to the new meta model. Such extended meta models can also reference elements of models created with the original meta model. Although the meta classes corresponding to inherited rules are redefined by the extending meta model, scope providers match the object types correctly. This is implemented by comparing the types by their name (see textx.textx_isinstance). Simple examples: see tests/functional/test_scoping/test_metamodel_provider*.py.
(2) Referencing elements from another meta model can be achieved without having
the original grammar, nor any other details like scope providers, etc. Such
references can, thus, be enabled by using just a referenced language name in a
reference statement of referring grammar. Target language meta-model may
originate from a library installed on the system (without sources, like the
grammar). The referencing grammar can reference the types (rules) of the
referenced meta model. Rule lookup takes care of choosing the correct types.
Simple examples: see
tests/functional/test_metamodel/test_multi_metamodel_refs.py.
To identify a referenced grammar you need to register the grammar to be referenced with the registration API.
When designing a domain model (e.g., from the software test domain) to reference elements of another domain model (e.g., from the interface/communication domain), the second possibility (see (2) referencing) is probably a cleaner way to achieve the task than the first possibility (see (1) extending).
A full example project that shows how multi-meta-modeling feature can be used is also available in a separate git repository.
Use Case: meta model referencing another meta model
The example in this section is based on the tests/functional/test_metamodel/test_multi_metamodel_refs.py.
We have two languages/grammars (grammar A and B). grammarA string defines
named elements of type A:
Model: a+=A;
A:'A' name=ID;
GrammarBWithImportURI string defines named elements of type B referencing
elements of type A (from grammarA). This is achieved by using reference
statement with alias. It also allows importing other model files by using
importURI.
reference A as a
Model: imports+=Import b+=B;
B:'B' name=ID '->' a=[a.A];
Import: 'import' importURI=STRING;
We now proceed by registering languages using registration API:
global_repo = scoping.GlobalModelRepository()
global_repo_provider = scoping_providers.PlainNameGlobalRepo()

def get_A_mm():
    mm_A = metamodel_from_str(grammarA, global_repository=global_repo)
    mm_A.register_scope_providers({"*.*": global_repo_provider})
    return mm_A

def get_BwithImport_mm():
    mm_B = metamodel_from_str(grammarBWithImport,
                              global_repository=global_repo)

    # define a default scope provider supporting the importURI feature
    mm_B.register_scope_providers(
        {"*.*": scoping_providers.FQNImportURI()})
    return mm_B

register_language('A',
                  pattern="*.a",
                  metamodel=get_A_mm)

register_language('BwithImport',
                  pattern="*.b",
                  metamodel=get_BwithImport_mm)
Note that we are using a global repository and FQNImportURI scoping provider
for B language to support importing of A models inside B models and
referencing its model objects.
In practice we would usually register our languages using declarative extension points. See the registration API docs for more information.
After the languages are registered we can access the meta-models of registered
languages using the registration API. Given the model in
language A in file myA_model.a:
A a1 A a2 A a3
and model in language B (with support for ImportURI) in file myB_model.b:
import 'myA_model.a'
B b1 -> a1 B b2 -> a2 B b3 -> a3
we can instantiate model myB_model.b like this:
mm_B = metamodel_for_language('BwithImport')
model_file_name = os.path.join(os.path.dirname(__file__), 'myB_model.b')
model = mm_B.model_from_file(model_file_name)
In another way we could use a global model repository directly to instantiate
models directly from Python code without resorting to ImportURI machinery.
For this we shall modify the grammar of language B to be:
reference A
Model: b+=B;
B:'B' name=ID '->' a=[A.A];
Notice that we are not using the ImportURI functionality to load the
referenced model here. Since both meta-models share the same global repository,
we can directly add a model object to the global_repo_provider (add_model)
of language A. This model object will then be visible to the scope provider of
the second model and make the model object available. We register this language
as we did above. Now, the code can look like this:
mm_A = metamodel_for_language('A')
mA = mm_A.model_from_str('''
A a1 A a2 A a3
''')
global_repo_provider.add_model(mA)

mm_B = metamodel_for_language('B')
mB = mm_B.model_from_str('''
B b1 -> a1 B b2 -> a2 B b3 -> a3
''')
See how we explicitly added model mA to the global repository. This enabled
model mB to find and resolve references to objects from mA.
It is crucial to use a scope provider which supports the global repository, such
as the ImporUri or the GlobalRepo based providers, to allow the described
mechanism to add a model object directly to a global repository.
Use Case: Recipes and Ingredients with global model sharing
The example in this section is based on the test_metamodel_provider2.py.
In this use case we define recipes (food preparation) including a list of ingredients. The ingredients of a recipe model element are defined by:
- a count (e.g. 100),
- a unit (e.g. gram),
- and an ingredient reference (e.g. sugar).
In a separate model the ingredients are defined: Here we can define multiple
units to be used for each ingerdient (e.g. 60 gram of sugar or
1 cup of sugar). Moreover some ingredients may inherit features of other ingredients
(e.g. salt may have the same units as sugar).
Here, two meta-models are defined:
Ingredient.tx, to handle ingredient definitions (e.g.fruits.ingredientmodel) andRecipe.tx, for recipe definitions (e.g.fruit_salad.recipemodel).
The registration API is utilized to bind the file extensions
to the meta-models (see
test_metamodel_provider2.py).
Importantly, a common model repository (global_repo) is defined to share all
model elements among both meta models:
i_mm = get_meta_model(
    global_repo, join(this_folder, "metamodel_provider2", "Ingredient.tx"))
r_mm = get_meta_model(
    global_repo, join(this_folder, "metamodel_provider2", "Recipe.tx"))

clear_language_registrations()
register_language(
    'recipe-dsl',
    pattern='*.recipe',
    description='demo',
    metamodel=r_mm
)
register_language(
    'ingredient-dsl',
    pattern='*.ingredient',
    description='demo',
    metamodel=i_mm
)
In practice we would usually register our languages using declarative extension points. See the registration API docs for more information.
Use Case: meta model sharing with the ImportURI-feature
The example in this section is based on the test_metamodel_provider.py.
In this use case we have a given meta-model to define components and instances of components. A second model is added to define users which use instances of components defined in the first model.
The grammar for the user meta-model is given as follows (including the ability to import a component model file).
import Components

Model:
    imports+=Import
    users+=User
;

User:
    "user" name=ID "uses" instance=[Instance:FQN] // Instance, FQN from other grammar
;

Import: 'import' importURI=STRING;
The registration API is utilized to bind a file extension to the corresponding meta-model:
register_language(
    'components-dsl',
    pattern='*.components',
    description='demo',
    metamodel=mm_components  # or a factory
)
register_language(
    'users-dsl',
    pattern='*.users',
    description='demo',
    metamodel=mm_users  # or a factory
)
With this construct we can define a user model referencing a component model:
import "example.components"
user pi uses usage.action1
In practice we would usually register our languages using declarative extension points. See the registration API docs for more information.
Use Case: referencing non-textX meta-models/models
The example in this section is based on the test_reference_to_buildin_attribute.py.
You can reference an arbitrary python object using the OBJECT rule (see:
test_reference_to_buildin_attribute.py)
Access:
    'access' name=ID pyobj=[OBJECT] ('.' pyattr=[OBJECT])?
In this case the referenced object will be a python dictionary referenced by
pyobj and the entry of such a dictionary will be referenced by pyattr. An
example model will look like:
access AccessName1 foreign_model.name_of_entry
foreign_model in this case is a plain Python dictionary provided as a custom
built-in and registered during meta-model
construction:
foreign_model = {
    "name": "Test",
    "value": 3
}
my_metamodel = metamodel_from_str(metamodel_str,
                                  builtins={
                                      'foreign_model': foreign_model})
A custom scope provider is used to achieve mapping of pyobj/pyattr to the
entry in the foreign_model dict:
def my_scope_provider(obj, attr, attr_ref):
    pyobj = obj.pyobj
    if attr_ref.obj_name in pyobj:
        return pyobj[attr_ref.obj_name]
    else:
        raise Exception("{} not found".format(attr_ref.obj_name))
The scope provider is linked to the pyattr attribute of the rule Access:
my_metamodel.register_scope_providers({
    "Access.pyattr": my_scope_provider,
})
With this, we can reference non-texX data elements from within our language. This can be used to, e.g., use a non-textX AST object and reference it from a textX model.
Use Case: referencing non-textX meta-models/models with a json file
The example in this section is based on the test_reference_to_nontextx_attribute.py.
In test_reference_to_nontextx_attribute.py we also demonstrate how such an external model can be loaded with our own language (using a json file as external model).
We want to access elements of JSON file from our model like this:
import "test_reference_to_nontextx_attribute/othermodel.json" as data
access A1 data.name
access A2 data.gender
Where the json file othermodel.json consists of:
{
  "name": "pierre",
  "gender": "male"
}
We start with the following meta-model:
Model:
    imports+=Json
    access+=Access
;
Access:
    'access' name=ID pyobj=[Json] '.' pyattr=[OBJECT]?
;

Json: 'import' filename=STRING 'as' name=ID;
Comment: /\/\/.*$/;
Now when resolving pyobj/pyattr combo of the Access rule we want to search
in the imported JSON file. To achieve this we will write and register a scope
provider that will load the referenced JSON file first time it is accessed and
that lookup for the pyattr key in that file:
def generic_scope_provider(obj, attr, attr_ref):
    if not obj.pyobj:
        from textx.scoping import Postponed
        return Postponed()
    if not hasattr(obj.pyobj, "data"):
        import json
        obj.pyobj.data = json.load(open(
            join(abspath(dirname(__file__)), obj.pyobj.filename)))
    if attr_ref.obj_name in obj.pyobj.data:
        return obj.pyobj.data[attr_ref.obj_name]
    else:
        raise Exception("{} not found".format(attr_ref.obj_name))

# create meta model
my_metamodel = metamodel_from_str(metamodel_str)
my_metamodel.register_scope_providers({
    "Access.pyattr": generic_scope_provider,
})
Conclusion
We provide a pragmatic way to define meta-models that use other meta-models. Mostly, we focus on textX meta-models using other textX meta-models. But scope providers may be used to also link a textX meta model to an arbitrary non-textX data structure.
Error handling
textX will raise an error if a syntax or semantic error is detected during meta-model or model parsing/construction.
For a syntax error TextXSyntaxError is raised. For a semantic error
TextXSemanticError is raised. Both exceptions inherit from TextXError. These
exceptions are located in textx.exceptions module.
All exceptions have message attribute with the error message, and line,
col and nchar attributes which represent line, column and substring length
where the error was found.
-
You can also raise
TextXSemanticErrorduring semantic checks (e.g. in object processors. These error classes accepts the message and location information (line,col,nchar,filename) which can be produced from any textX model object usingget_location:from textx import get_location, TextXSemanticError ... def my_processor(entity): ... check something raise TextXSemanticError('Invalid entity', **get_location(entity)) ...
See also textx command/tool for (meta)model checking from command line.
Debugging
textX supports debugging on the meta-model (grammar) and model levels. If debugging is enabled, textX will print various debugging messages.
If the debug parameter of the meta-model construction is set to True, debug
messages during grammar parsing and meta-model construction will be printed.
Additionally, a parse tree created during the grammar parsing as well as
meta-model (if constructed successfully) dot files will be generated:
form textx.metamodel import metamodel_from_file

robot_metamodel = metamodel_from_file('robot.tx', debug=True)
If debug is set in the model_from_file/str calls, various messages during
the model parsing and construction will be printed. Additionally, parse tree
created from the input as well as the model will be exported to dot files.
robot_program = robot_metamodel.model_from_file('program.rbt', debug=True)
Alternatively, you can use textx check or generate command in debug mode.
$ textx --debug generate --grammar robot.tx program.rbt --target dot

*** PARSING LANGUAGE DEFINITION ***
New rule: grammar_to_import -> RegExMatch
New rule: import_stm -> Sequence
New rule: rule_name -> RegExMatch
New rule: param_name -> RegExMatch
New rule: string_value -> OrderedChoice
New rule: rule_param -> Sequence
Rule rule_param founded in cache.
New rule: rule_params -> Sequence
...

>> Matching rule textx_model=Sequence at position 0 => */* This ex
  >> Matching rule ZeroOrMore in textx_model at position 0 => */* This ex
      >> Matching rule import_stm=Sequence in textx_model at position 0 => */* This ex
        ?? Try match rule StrMatch(import) in import_stm at position 0 => */* This ex
        >> Matching rule comment=OrderedChoice in import_stm at position 0 => */* This ex
            ?? Try match rule comment_line=RegExMatch(//.*?$) in comment at position 0 => */* This ex
            -- NoMatch at 0
            ?? Try match rule comment_block=RegExMatch(/\*(.|\n)*?\*/) in comment at position 0 => */* This ex

...


Generating 'robot.tx.dot' file for meta-model.
To convert to png run 'dot -Tpng -O robot.tx.dot'
Generating 'program.rbt.dot' file for model.
To convert to png run 'dot -Tpng -O program.rbt.dot'
This command renders parse trees and parser models of both textX and your language to dot files. Also, a meta-model and model of the language will be rendered if parsed correctly.
By default all debug messages will be printed to stdout. You can provide file
parameter to metamodel_from_file/str to specify file-like object where all
messages should go.
Generator framework based on Jinja template engine
This framework is implemented in
textX-jinja project. You have to install
it with pip install textX-jinja to be able to use it.
You can roll your own code generation approach with textX but sometimes it is good to have a predefined framework which is easy to get started with and only if you need something very specific later you can create your own code generator.
Here, we describe a little framework based on Jinja template engine.
The idea is simple. If you want to generate a set of files from your textX
model(s) you create a folder which resembles the outline of the file tree you
want to generate. Each file in your template folder can be a Jinja template
(with .jinja extension, e.g. index.html.jinja), in which case target file
will be created by running the template through the Jinja engine. If the file
doesn't end with .jinja extension it is copied as is to the target folder.
To call Jinja generator you use textx_jinja_generator function:
...
from textxjinja import textx_jinja_generator
...

@generator('mylang', 'mytarget')
def mygenerator(metamodel, model, output_path, overwrite, debug):
    "Generate MyTarget from MyLang model."

    # Prepare context dictionary
    context = {}
    context['some_param'] = "Some value"

    template_folder = os.path.join(THIS_FOLDER, 'template')

    # Run Jinja generator
    textx_jinja_generator(template_folder, output_path, context, overwrite)
In this example we have our templates stored in template folder.
You can use variables from context dict in your templates as usual, but also
you can use them in filenames. If file name has a variable name in the format
__<variablename>__ it will be replaced by the value of the variable from the
context dict. If variable by the given name is not found the variablename is
treated as literal filename. For example
__package__
in the template file names will be replaced by package name from context dict.
Boolean values in file names are treated specially. If the value is of a bool
type the file will be skipped entirely if the value is False but will be used
if the value is True. This makes it easy to provide templates/files which
should be generated only under certain conditions (for example see __lang__
and __gen__ variable usage in template
names)
If a variable from context is iterable, then the generator will produce a file for each element of the iterable.
Parameter transform_names is a callable that is used to transform model
variables and return a string that will be used instead. It is applied to both
iterable and non-iterable model objects. This
test
is an example usage of iterables and name tranformation.
To see a full example of using textX-jinja you can take a look at the
implementation of startproject textX command in
textX-dev project. This textX command will
run a questionnaire based on the Questionnaire
DSL and with run a project
scaffolding generation by calling
textx_jinja_generate
with the templates for the
project.
Hello World example
This is an example of very simple Hello World like language.
A .tx file extension is used for textX grammar. See textX
grammar on what you can do inside a grammar file, including
comments!
These are the steps to build a very basic Hello World - like language.
-
Write a language description in textX (file
hello.tx):HelloWorldModel: 'hello' to_greet+=Who[','] ; Who: name = /[^,]*/ ;Description consists of a set of parsing rules which at the same time describe Python classes that will be dynamically created and used to instantiate objects of your model. This small example consists of two rules:
HelloWorldModelandWho.HelloWorldModelstarts with the keywordhelloafter which a one or moreWhoobject must be written separated by commas.Whoobjects will be parsed, instantiated and stored in ato_greetlist on aHelloWorldModelobject.Whoobjects consists only of its names which must be matched the regular expression rule/[^,]*/(match non-comma zero or more times). Please see textX grammar section for more information on writing grammar rules. -
At this point you can check and visualise meta-model using following command from the command line:
 $ textx generate hello.tx --target dot
 Generating dot target from models:
 /home/igor/repos/textX/textX/examples/hello_world/hello.tx
 -> /home/igor/repos/textX/textX/examples/hello_world/hello.dot
   To convert to png run "dot -Tpng -O hello.dot"
You can see that for each rule from language description an appropriate Python class has been created. A BASETYPE hierarchy is built-in. Each meta-model has it.
-
Create some content (i.e. model) in your new language (
example.hello):hello World, Solar System, UniverseYour language syntax is also described by language rules from step 1.
If we break down the text of the example model it looks like this:
We see that the whole line is a
HelloWorldModeland the partsWorld,Solar System, andUniverseareWhoobjects. Red coloured text is syntactic noise that is needed by the parser (and programmers) to recognize the boundaries of the objects in the text. -
To use your models from Python first create meta-model from textX language description (file
hello.py):from textx import metamodel_from_file hello_meta = metamodel_from_file('hello.tx') -
Than use meta-model to create models from textual description:
hello_model = hello_meta.model_from_file('example.hello')Textual model
example.hellowill be parsed and transformed to plain Python objects. Python classes of the created objects are those defined by the meta-model. Returned objecthello_modelwill be a reference to the root of the model, i.e. the object of classHelloWorldModel. You can use the model as any other Python object. For example:print("Greeting", ", ".join([to_greet.name for to_greet in hello_model.to_greet])) -
You can optionally export model to
dotfile to visualize it. Run following from the command line:$ textx generate example.hello --grammar hello.tx --target dot Generating dot target from models: /home/igor/repos/textX/textX/examples/hello_world/example.hello -> /home/igor/repos/textX/textX/examples/hello_world/example.dot To convert to png run "dot -Tpng -O example.dot"This is an object graph automatically constructed from
example.hellofile.We see that each
Whoobject is contained in the python attributeto_greetof list type which is defined by the grammar. -
Use your model: interpret it, generate code … It is a plain Python graph of objects with plain attributes!
Try out a complete tutorial for building a simple robot language.
Robot tutorial
In this tutorial we will build a simple robot language to demonstrate the basic workflow when working with textX.
Robot language
When building a DSL we should first do a domain analysis, to see what concepts do we have and what are their relationships and constraints. In the following paragraph a short analysis is done. Important concepts are emphasized.
In this case we want an imperative language that should define robot movement
on the imaginary grid. Robot should move in four base direction. We will
call these directions up, down, left and right (you could use north, south,
west and east if you like). Additionally, we shall have a robot coordinate given
in x, y position. For simplicity, our robot can move in discrete steps. In
each movement robot can move by 1 or more steps but in the same direction.
Coordinate is given as a pair of integer numbers. Robot will have an initial position. If not given explicitly it is assumed that position is (0, 0).
So, lets build a simple robot language.
Grammar
First, we need to define a grammar for the language. In textX the grammar will also define a meta-model (a.k.a. abstract syntax) for the language which can be visualized and be used as a part of the documentation.
Usually we start by outlining some program in the language we are building.
Here is an example program on robot language:
begin
    initial 3, 1
    up 4
    left 9
    down
    right 1
end
We have begin and end keywords that define the beginning and end of the
program. In this case we could do without these keywords but lets have it to
make it more interesting.
In between those two keywords we have a sequence of instruction. First
instruction will position our robot at coordinate (3, 1). After that robot
will move up 4 steps, left 9 steps, down 1 step (1 step is the default)
and finally 1 step to the right.
Lets start with grammar definition. We shall start in a top-down manner so lets first define a program as a whole.
Program:
  'begin'
    commands*=Command
  'end'
;
Here we see that our program is defined with sequence of:
- string match (
'begin'), - zero or more assignment to
commandsattribute, - string match (
'end').
String matches will require literal strings given at the begin and end of
program. If this is not satisfied a syntax error will be raised. This whole rule
(Program) will create a class with the same name in the meta-model. Each
program will be an instance of this class. commands assignment will result in
a python attribute commands on the instance of Program class. This attribute
will be of Python list type (because *= assignment is used). Each element
of this list will be a specific command.
Now, we see that we have different types of commands. First command has two parameters and it defines the robot initial position. Other commands has one or zero parameters and define the robot movement.
To state that some textX rule is specialised in 2 or more rules we use an
abstract rule. For Command we shall define two specializations:
InitialCommand and MoveCommand like this:
Command:
  InitialCommand | MoveCommand
;
Abstract rule is given as ordered choice of other rules. This can be read as Each command is either a InitialCommand or MoveCommand.
Lets now define command for setting initial position.
InitialCommand:
  'initial' x=INT ',' y=INT
;
This rule specifies a class InitialCommand in the meta-model. Each initial
position command will be an instance of this class.
So, this command should start with the keyword initial after which we give an
integer number (base type rule INT - this number will be available as
attribute x on the InitialCommand instance), than a separator , is
required after which we have y coordinate as integer number (this will be
available as attribute y). Using base type rule INT matched number from
input string will be automatically converted to python type int.
Now, lets define a movement command. We know that this command consists of direction identifier and optional number of steps (if not given the default will be 1).
MoveCommand:
  direction=Direction (steps=INT)?
;
So, the movement command model object will have two attributes.
direction attribute will define one of the four possible directions and
steps attribute will be an integer that will hold how many steps a robot
will move in given direction. Steps are optional so if not given in the program
it will still be a correct syntax. Notice, that the default of 1 is not
specified in the grammar. The grammar deals with syntax constraints. Additional
semantics will be handled later in model/object processors (see below).
Now, the missing part is Direction rule referenced from the previous rule.
This rule will define what can be written as a direction. We will define this
rule like this:
Direction:
  "up"|"down"|"left"|"right"
;
This kind of rule is called a match rule. This rule does not result in a new object. It consists of ordered choice of simple matches (string, regex), base type rules (INT, STRING, BOOL...) and/or other match rule references.
The result of this match will be assigned to the attribute from which it was referenced. If base type was used it will be converted in a proper python type. If not, it will be a python string that will contain the text that was matched from the input.
In this case a one of 4 words will be matched and that string will be assigned
to the direction attribute of the MoveCommand instance.
The final touch to the grammar is a definition of the comment rule. We want to comment our robot code, right?
In textX a special rule called Comment is used for that purpose.
Lets define a C-style single line comments.
Comment:
  /\/\/.*$/
;
Our grammar is done. Save it in robot.tx file. The content of this file
should now be:
Program:
  'begin'
    commands*=Command
  'end'
;

Command:
  InitialCommand | MoveCommand
;

InitialCommand:
  'initial' x=INT ',' y=INT
;

MoveCommand:
  direction=Direction (steps=INT)?
;

Direction:
  "up"|"down"|"left"|"right"
;

Comment:
  /\/\/.*$/
;
Notice that we have not constrained initial position command to be specified just once on the beginning of the program. This basically means that this command can be given multiple times throughout the program. I will leave as an exercise to the reader to implement this constraint.
Next step during language design is meta-model visualization. It is usually easier to comprehend our language if rendered graphically. To do so we use excellent GraphViz software package and its DSL for graph specification called dot. It is a textual language for visual graph definition.
Lets check our meta-model and export it to the dot language.
$ textx generate robot.tx --target dot
Generating dot target from models:
/home/igor/repos/textX/textX/examples/robot/robot.tx
-> /home/igor/repos/textX/textX/examples/robot/robot.dot
  To convert to png run "dot -Tpng -O robot.dot"
dot file can be opened with dot viewer (there are many to choose from) or
transformed with dot tool to raster or vector graphics.
For example:
$ dot -Tpng -O robot.dot
This command will create png image out of dot file.

Instantiating meta-model
In order to parse our models we first need to construct a meta-model. A textX meta-model is a Python object that contains all classes that can be instantiated in our model. For each grammar rule a class is created. Additionally, meta-model contains a parser that knows how to parse input strings. From parsed input (parse tree) meta-model will create a model.
Meta-models are created from our grammar description, in this case
robot.tx file. Open robot.py Python file and write following:
from textx import metamodel_from_file
robot_mm = metamodel_from_file('robot.tx')
Instantiating model
Now, when we have our meta-model we can parse models from strings or external
textual files. Extend your robot.py with:
robot_model = robot_mm.model_from_file('program.rbt')
This command will parse the file program.rbt and construct our robot model.
If this file does not match our language a syntax error will be raised on the
first error encountered.
In the same manner as meta-model visualization we can visualize our model too.
$ textx generate program.rbt --grammar robot.tx --target dot
Generating dot target from models:
/home/igor/repos/textX/textX/examples/robot/program.rbt
-> /home/igor/repos/textX/textX/examples/robot/program.dot
  To convert to png run "dot -Tpng -O program.dot"
This will create program.dot file that can be visualized using proper viewer
or transformed to image.
$ dot -Tpng -O program.dot
For the robot program above we should get an image like this:
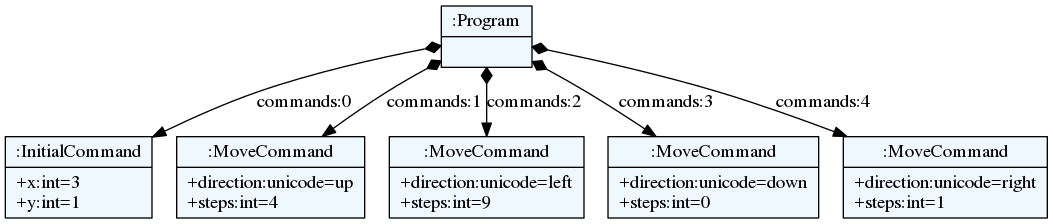
Interpreting model
When we have successfully parsed and loaded our model/program (or mogram or prodel ;) ) we can do various stuff. Usually what would you like to do is to translate your program to some other language (Java, Python, C#, Ruby,...) or you could build an interpreter that will evaluate/interpret your model directly. Or you could analyse your model, extract informations from it etc. It is up to you to decide.
We will show here how to build a simple interpreter that will start the robot from the initial position and print the position of the robot after each command.
Lets imagine that we have a robot that understands our language. In your
robot.py file add:
class Robot:

    def __init__(self):
        # Initial position is (0,0)
        self.x = 0
        self.y = 0

    def __str__(self):
        return f"Robot position is {self.x}, {self.y}."
Now, our robot will have an interpret method that accepts our robot model and
runs it. At each step this method will update the robot position and print it.
def interpret(self, model):

    # model is an instance of Program
    for c in model.commands:

        if c.__class__.__name__ == "InitialCommand":
            print(f"Setting position to: {c.x}, {c.y}")
            self.x = c.x
            self.y = c.y
        else:
            print(f"Going {c.direction} for {c.steps} step(s).")

            move = {
                "up": (0, 1),
                "down": (0, -1),
                "left": (-1, 0),
                "right": (1, 0)
            }[c.direction]

            # Calculate new robot position
            self.x += c.steps * move[0]
            self.y += c.steps * move[1]

        print(self)
Now lets give our robot_model to Robot instance and see what happens.
robot = Robot()
robot.interpret(robot_model)
You should get this output:
Setting position to: 3, 1
Robot position is 3, 1.
Going up for 4 step(s).
Robot position is 3, 5.
Going left for 9 step(s).
Robot position is -6, 5.
Going down for 0 step(s).
Robot position is -6, 5.
Going right for 1 step(s).
Robot position is -5, 5.
It is almost correct. We can see that down movement is for 0 steps because we
have not defined the steps for down command and haven't done anything yet to
implement default of 1.
The best way to implement default value for step is to use so called object
processor for MoveCommand.
Object processor is a callable that gets called whenever textX parses and
instantiates an object of particular class. Use register_obj_processors
method on meta-model to register callables/processors for classes your wish to
process in some way immediately after instantiation.
Lets define our processor for MoveCommand in robot.py file.
def move_command_processor(move_cmd):

  # If steps is not given, set it do default 1 value.
  if move_cmd.steps == 0:
    move_cmd.steps = 1
Now, register this processor on meta-model. After meta-model construction add a line for registration.
robot_mm.register_obj_processors({'MoveCommand': move_command_processor})
register_obj_processors accepts a dictionary keyed by class name. The
values are callables that should handle instances of the given class.
If you run robot interpreter again you will get output like this:
Setting position to: 3, 1
Robot position is 3, 1.
Going up for 4 step(s).
Robot position is 3, 5.
Going left for 9 step(s).
Robot position is -6, 5.
Going down for 1 step(s).
Robot position is -6, 4.
Going right for 1 step(s).
Robot position is -5, 4.
And now our robot behaves as expected!
The code from this tutorial can be found in the examples/robot folder.
Next, you can read the Entity tutorial where you can see how to generate source code from your models.
Entity tutorial
A tutorial for building ER-like language and generating Java code.
Entity language
In this example we will see how to make a simple language for data modeling. We will use this language to generate Java source code (POJO classes).
Our main concept will be Entity. Each entity will have one or more
properties. Each property is defined by its name and its type.
Let's sketch out a model in our language.
entity Person {
  name : string
  address: Address
  age: integer
}

entity Address {
  street : string
  city : string
  country : string
}
The grammar
In our example we see that each entity starts with a keyword entity. After
that, we have a name that is the identifier and an open bracket.
Between the brackets we have properties. In textX this is written as:
Entity:
    'entity' name=ID '{'
        properties+=Property
    '}'
;
We can see that the Entity rule references Property rule from the
assignment. Each property is defined by the name, colon (:) and the
type's name. This can be written as:
Property:
    name=ID ':' type=ID
;
Now, grammar defined in this way will parse a single Entity. We haven't stated
yet that our model consists of many Entity instances.
Let's specify that. We are introducing a rule for the whole model which states
that each entity model contains one or more entities.
EntityModel:
    entities+=Entity
;
This rule must be the first rule in the textX grammar file. First rule is always
considered a root rule.
This grammar will parse the example model from the beginning.
At any time you can check and visualize entity meta-model and person model using commands:
$ textx generate entity.tx --target dot
$ textx generate person.ent --grammar entity.tx --target dot
Given grammar in file entity.tx and example Person model in file
person.ent.
These commands will produce entity.dot and person.dot files which can be
viewed by any dot viewer or converted to e.g. PNG format using command:
$ dot -Tpng -O *.dot
Note that GraphViz must be installed to use dot command line utility.
Meta-model now looks like this:

While the example (Person model) looks like this:

What you see on the model diagram are actual Python objects.
It looks good, but it would be even better if a reference to Address from
properties was an actual Python reference, not just a value of str type.
This resolving of object names to references can be done automatically by textX.
To do so, we shall change our Property rule to be:
Property:
    name=ID ':' type=[Entity]
;
Now, we state that type is a reference (we are using []) to an object of the Entity
class. This instructs textX to search for the name of the Entity after the
colon and when it is found to resolve it to an Entity instance with the same name
defined elsewhere in the model.
But, we have a problem now. There are no entities called string and integer
which we used for several properties in our model. To remedy this, we must
introduce dummy entities with those names and change properties attribute
assignment to be zero or more (*=) since our dummy entities will have no
attributes.
Although, this solution is possible it wouldn't be elegant at all. So let's
do something better. First, let's introduce an abstract concept called Type
which as the generalization of simple types (like integer and string) and
complex types (like Entity).
Type:
  SimpleType | Entity
;
This is called abstract rule, and it means that Type is either a SimpleType
or an Entity instance. Type class from the meta-model will never be
instantiated.
Now, we shall change our Property rule definition:
Property:
    name=ID ':' type=[Type]
;
And, at the end, there must be a way to specify our simple types. Let's do that at the beginning of our model.
EntityModel:
    simple_types *= SimpleType
    entities += Entity
;
And the definition of SimpleType would be:
SimpleType:
  'type' name=ID
;
So, simple types are defined at the beginning of the model using the keyword type
after which we specify the name of the type.
Our person model will now begin with:
type string
type integer

entity Person {
...
Meta-model now looks like this:

While the example (Person model) looks like this:

But, we can make this language even better. We can define some built-in simple
types so that the user does not need to specify them for every model. This has
to be done from python during meta-model instantiation. We can instantiate
integer and string simple types and introduce them in every model
programmatically.
The first problem is how to instantiate the SimpleType class. textX will dynamically
create a Python class for each rule from the grammar but we do not have access
to these classes in advance.
Luckily, textX offers a way to override dynamically created classes with user
supplied ones. So, we can create our class SimpleType and register that class
during meta-model instantiation together with two of its instances (integer and
string).
class SimpleType:
  def __init__(self, parent, name):  # remember to include parent param.
    self.parent = parent
    self.name = name
Now, we can make a dict of builtin objects.
myobjs =  {
  'integer': SimpleType(None, 'integer'),
  'string': SimpleType(None, 'string')
}
And register our custom class and two builtins on the meta-model:
meta = metamodel_from_file('entity.tx',
                            classes=[SimpleType],
                            builtins=myobjs)
Now, if we use meta to load our models we do not have to specify integer and
string types. Furthermore, each instance of SimpleType will be an instance
of our SimpleType class.
We, can use this custom classes support to implement any custom behaviour in our object graph.
Generating source code
textX doesn't impose any specific library or process for source code generation.
You can use anything you like. From the print function to template engines.
I highly recommend you to use some of the well-established template engines.
Here, we will see how to use Jinja2 template engine to generate Java source code from our entity models.
First, install jinja2 using pip:
$ pip install Jinja2
Now, for each entity in our model we will render one Java file with a pair of getters and setters for each property.
Let's write Jinja2 template (file java.template):
// Autogenerated from java.template file
class {{entity.name}} {

  {% for property in entity.properties %}
  protected {{property.type|javatype}} {{property.name}};
  {% endfor %}

  {% for property in entity.properties %}
  public {{property.type|javatype}} get{{property.name|capitalize}}(){
    return this.{{property.name}};
  }

  public void set{{property.name|capitalize}}({{property.type|javatype}} new_value){
    this.{{property.name}} = new_value;
  }

  {% endfor %}
}
Templates have static parts that will be rendered as they are, and variable parts
whose content depends on the model. Variable parts are written inside
{{}}. For example {{entity.name}} from the second line is the name of
the current entity.
The logic of rendering is controlled by tags written in {%...%} (e.g. loops,
conditions).
We can see that this template will render a warning that this is auto-generated code (it is always good to do that!). Then it will render a Java class named after the current entity and then, for each property in the entity (please note that we are using textX model so all attribute names come from the textX grammar) we are rendering a Java attribute. After that, we are rendering getters and setters.
You could notice that for rendering proper Java types we are using |javatype
expression. This is called filter in Jinja2. It works similarly to unix pipes.
You have an object and you pass it to some filter. Filter will transform the given
object to some other object. In this case javatype is a simple python function
that will transform our types (integer and string) to proper Java types
(int and String).
Now, let's see how we can put this together. We need to initialize the Jinja2 engine, instantiate our meta-model, load our model and then iterate over the entities from our model and generate a Java file for each entity:
from os import mkdir
from os.path import exists, dirname, join
import jinja2
from textx import metamodel_from_file

this_folder = dirname(__file__)


class SimpleType:
    def __init__(self, parent, name):
        self.parent = parent
        self.name = name

    def __str__(self):
        return self.name


def get_entity_mm():
    """
    Builds and returns a meta-model for Entity language.
    """
    type_builtins = {
            'integer': SimpleType(None, 'integer'),
            'string': SimpleType(None, 'string')
    }
    entity_mm = metamodel_from_file(join(this_folder, 'entity.tx'),
                                    classes=[SimpleType],
                                    builtins=type_builtins)

    return entity_mm


def main(debug=False):

    # Instantiate the Entity meta-model
    entity_mm = get_entity_mm()

    def javatype(s):
        """
        Maps type names from SimpleType to Java.
        """
        return {
                'integer': 'int',
                'string': 'String'
        }.get(s.name, s.name)

    # Create the output folder
    srcgen_folder = join(this_folder, 'srcgen')
    if not exists(srcgen_folder):
        mkdir(srcgen_folder)

    # Initialize the template engine.
    jinja_env = jinja2.Environment(
        loader=jinja2.FileSystemLoader(this_folder),
        trim_blocks=True,
        lstrip_blocks=True)

    # Register the filter for mapping Entity type names to Java type names.
    jinja_env.filters['javatype'] = javatype

    # Load the Java template
    template = jinja_env.get_template('java.template')

    # Build a Person model from person.ent file
    person_model = entity_mm.model_from_file(join(this_folder, 'person.ent'))

    # Generate Java code
    for entity in person_model.entities:
        # For each entity generate java file
        with open(join(srcgen_folder,
                      "%s.java" % entity.name.capitalize()), 'w') as f:
            f.write(template.render(entity=entity))


if __name__ == "__main__":
    main()
And the generated code will look like this:
// Autogenerated from java.template file
class Person {

  protected String name;
  protected Address address;
  protected int age;

  public String getName(){
    return this.name;
  }

  public void setName(String new_value){
    this.name = new_value;
  }

  public Address getAddress(){
    return this.address;
  }

  public void setAddress(Address new_value){
    this.address = new_value;
  }

  public int getAge(){
    return this.age;
  }

  public void setAge(int new_value){
    this.age = new_value;
  }

}
The code from this tutorial can be found in the examples/Entity folder.
State machine language
This is a video tutorial that explains the implementation of the StateMachine example.
See the blog post about this language implementation.
Toy language compiler
A toy language compiler tutorial
Windel Bouwman wrote an excellent tutorial for using textX and ppci to write a compiler for a simple language.
self-dsl
A tutorial site on creation of Domain-Specific Languages.
Pierre Bayerl is maintaining an excellent tutorial site on writing DSL for both Xtext and textX. Check out his tutorial for textX.
Turtle graphics language
A turtle graphics language interpreter with VS Code support
Allesio Stalla from Strumenta wrote an excellent tutorial on building a Turtle graphics language, an interpreter and a plugin for VS Code using textX-LS project. This is a complete step-by-step tutorial on how to create a textX language project and a supporting VS Code plugin.
Contributing
See this document.
textX release process
For the background see here.
- We are using semantic versioning and a standard format to keep changelogs (see CHANGELOG.md).
- We develop features on feature branches. Feature branches are named
feature/<feature name>. - We fix bugs on bugfix branches named as
bugfix/<issue no>-<name> - We have a branch for the upcoming major release --
next-release(red in the picture bellow). - If the feature is backward incompatible (BIC) the PR is made against the
next-releasebranch (not against themasterbranch) - If the feature is backward compatible PR is made against the
master. - Thus,
Unreleasedsection in the changelog on themasterbranch will never have any BIC change. All BIC changes should go to the changelog on thenext-releasebranch. - We constantly merge
masterbranch tonext-releasebranch. Thus,next-releasebranch is the latest and greatest version with all finished features applied. - When the time for minor release come we follow textX release checklist defined bellow.
- When the time for major release come we merge
next-releasebranch tomasterand follow textX release checklist defined bellow.
textX release checklist
-
Create a branch for the next release called
release/<version>and switch to that branch. -
Update version in the
pyproject.toml. -
Update CHANGELOG (create new section for the release, update github links, give credits to contributors). Do not forget link to changes at the bottom.
-
Push release branch and create PR. Wait for tests to pass. Wait for the review process to complete.
-
Delete all previous distributions in the
distfolder.rm dist/* -
Create
whl/tar.gzpackages.flit build -
Release to PyPI testing.
flit publish --repository testpypi- Check release at https://test.pypi.org/project/textX/#history
-
Release to PyPI.
flit publish- Check release at https://pypi.org/project/textX/#history
-
In case of errors repeat steps 3-10.
-
Create git tag (e.g.
4.1.0). Push the tag.git tag -s 4.1.0 -m 'Release 4.1.0' git push --tags origin 4.1.0 -
Merge release branch in to
master. -
Change the version in
pyproject.tomlto next minor version with.dev0addition (e.g.4.2.0.dev0). -
Merge
mastertonext-releaseto keep it up-to-date.
For supporting previous versions only bugfix releases will be made as necessary.
The process is similar. The difference would be that PR would be issued against
the release branch instead of the master branch as is done for regular
releases.
Comparing textX to other tools
There are generally two classes of textual DSL tools textX could be compared to.
The first class comprises tools that use traditional parsing technologies, i.e. given a grammar (usually a context-free grammar) they produce program code capable of recognizing whether a given textual input conforms to the given grammar. Furthermore, they enable either transformation of textual input to a tree structure (i.e. parse tree), that is processed afterwards, or definition of actions that should be executed during parsing if a particular pattern is recognized. Most popular representatives in this class are lex and yacc, ANTLR, GNU bison, These kind of tools are generally known by the name Parser Generators.
textX's differences in regard to this first class are following:
- textX works as grammar interpreter i.e. parser code is not generated by the tool but the tools is configured by the grammar to recognize textual input on the language specified by the grammar. You can even embed your grammar as a Python string. This enables faster round-trip from grammar to the working parsers as the parser don't need to be regenerated but only reconfigured.
- Most of the classical parsing tools use context-free grammars while textX uses PEG grammars. The consequences are that lookahead is unlimited and there are no ambiguities possible as the alternative operator is ordered. Additionally, there is no need for a separate lexer.
- textX uses a single textual specification (grammar) to define not only the syntax of the language but also its meta-model (a.k.a. abstract syntax). The textX's meta-language is inspired by Xtext. This is very important feature which enables automatic construction of the model (a.k.a. abstract semantic graph - ASG or semantic model) without further work from the language designer. In traditional parsing tools transformation to the model usually involves coding of parse actions or manually written parse tree transformation.
The second class of textual DSL tools are more powerful tools geared especially towards DSL construction. These kind of tools are generally known by the name Language Workbenches coined by Martin Fowler. Most popular representatives of this class are Xtext, Spoofax and MPS. These tools are much more complex, highly integrated to the particular development environment (IDE) but provide powerful tooling infrastructure for language development, debugging and evolving. These tools will build not only parser but also a language-specific editor, debugger, validator, visualiser etc.
textX is positioned between these two classes of DSL tools. The goal of textX project is not a highly sophisticated DSL engineering platform but a simple DSL Python library that can be used in various Python applications and development environment. It can also be used for non-Python development using code generation from textX models (see Entity tutorial). Tooling infrastructure, editor support etc. will be developed as independent projects (see for example textx-tools).
Difference to Xtext grammar language
textX grammar language is inspired by Xtext and thus there are a lot of similarities between these tools when it come to grammar specification. But, there are also differences in several places. In this section we shall outline those differences to give users already familiar with Xtext a brief overview.
Lexer and terminal rules
textX uses PEG parsing which doesn't needs separate lexing phase. This
eliminate the need to define lexemes in the grammar. Therefore, there is no
terminal keyword in the textX nor any of special terminal definition rules
used by Xtext.
Types used for rules
Xtext integrates tightly with Java and Ecore typing system providing keyword
returns in rule definition by which language designer might define a class
used to instantiate objects recognized by the parser.
textX integrates with Python typing system. In textX there is no keyword
returns. The class used for the rule will be dynamically created Python class
for all non-match rules. Language designer can
provide class using user classes registration on meta-model. If the rule
is of [match type] than it will always return Python string or some of base
Python types for BASETYPES inherited rules.
Assignments
In textX there are two types of many assignments (*= - zero or more, += -
one or more) whereas in Xtext there is only one (+=) which defines the type
of the inferred attribute but doesn't specify any information for the parser.
Thus, if there should be zero or more matched elements you must additionally
wrap your expression in zero or more match:
In Xtext:
Domainmodel :
    (elements+=Type)*;
In textX:
Domainmodel :
    elements*=Type;
Similarly, optional assignment in Xtext is written as:
static?='static'?
In textX a '?' at the end of the expression is implied, i.e. rhs of the assignment will be optional:
static?='static'
Regular expression match
In Xtext terminal rules are described using EBNF.
In textX there is no difference between parser and terminal rules so you can
use the full textX language to define terminals. Furthermore, textX gives you
the full power of Python regular
expressions through
regular expression match. Regex matches are defined
inside / /. Anything you can use in Python re
module you can use here. This
gives you quite powerful sublanguage for pattern definition.
In Xtext:
terminal ASCII:
'0x' ('0'..'7') ('0'..'9'|'A'..'F');
In textX:
ASCII:
/0x[0-7](\d|[A-F])/;
Literal Regex match can be used anywhere a regular match rule can be used.
For example:
Person:
name=/[a-zA-Z]+/ age=INT;
Repetition modifiers
textX provides a syntactic construct called repetition modifier which enables parser to be altered during parsing of a specific repetition expression.
For example, there is often a need to define a separated list of elements.
To match a list of integers separated by comma in Xtext you would write:
list_of_ints+=INT (',' list_of_ints+=INT)*
In textX the same expression can be written as:
list_of_inst+=INT[',']
The parser is instructed to parse one or more INT with commas in between. Repetition modifier can be a regular expression match too.
For example, to match one or more integer separated by comma or semi-colon:
list_of_ints+=INT[/,|;/]
Inside square brackets more than one repetition modifier can be defined. See section in the docs for additional explanations.
We are not aware of the similar feature in Xtext.
Rule modifiers
Similarly to repetition modifiers, in textX parser can be altered at the rule level too. Currently, only white-space alteration can be defined on the rule level:
For example:
Rule:
'entity' name=ID /\s*/ call=Rule2;
Rule2[noskipws]:
'first' 'second';
Parser will be altered for Rule2 not to skip white-spaces. All rules down the
call chain inherit modifiers.
There are hidden rules in Xtext which can achieve the similar effect, even define different kind of tokens that can be hidden from the semantic model, but the rule modifier in textX serve different purpose. It is a general mechanism for parser alteration per rule that can be used in the future to define some other alteration (e.g. case sensitivity).
Unordered groups
Xtext support unordered groups using & operator.
For example:
Modifier:
static?='static'? & final?='final'? & visibility=Visibility;
enum Visibility:
PUBLIC='public' | PRIVATE='private' | PROTECTED='protected';
In textX unordered groups are specified as a special kind of repetitions. Thus, repetition modifiers can be applied also:
Modifier:
(static?='static' final?='final' visibility=Visibility)#[',']
Visibility:
'public' | 'private' | 'protected';
Previous example will match any of the following:
private, static, final
static, private, final
...
Notice the use of , separator as a repetition modifier.
Syntactic predicates
textX is based on PEG grammars. Unlike CFGs, PEGs can't be ambiguous, i.e. if an input parses it has exactly one parse tree. textX is backtracking parser and will try each alternative in predetermined order until it succeeds. Thus, textX grammar can't be ambiguous. Nevertheless, sometimes it is not possible to specify desired parse tree by reordering alternatives. In that case syntactic predicates are used. textX implements both and- and not- syntactic predicates.
On the other hand, predictive non-backtracking parsers (as is ANTLR used by Xtext) must make a decision which alternative to chose. Thus, grammar might be ambiguous and additional specification is needed by a language designer to resolve ambiguity and choose desired parse tree. Xtext uses a positive lookahead syntactic predicates (=> and ->). See here.
Hidden rules
Xtext uses hidden terminal
symbols
to suppress non-important parts of the input from the semantic model. This is
used for comments, whitespaces etc. Terminal rules are referenced from the
hidden list in the parser rules. All rules called from the one using hidden
terminals inherits them.
textX provides support for whitespaces alteration on the parser level and rule level and a special Comment match rule that can be used to describe comments pattern which are suppressed from the model. Comment rule is currently defined for the whole grammar, i.e. can't be altered on a per-rule basis.
Parent-child relationships
textX will provide explicit parent reference on all objects that are
contained inside some other objects. This attribute is a plain Python
attribute. The relationship is imposed by the grammar.
Xtext, begin based on Ecore, provides similar mechanism through Ecore API.
Enums
Xtext support Enum rules while textX does not. In textX you use match rule with ordered choice to mimic enums.
Scoping
Scoping in textX is done either by using Python through registration of scope providers, or declaratively using Reference Resolving Expression Language.
Xtext provides a Scoping API which can be used by the Xtend code to specify scoping rules.
Additional differences in the tool usage
Some of the differences in tools usage are outlined here.
REPL
textX is Python based, thus it is easy to interactively play with it on the Python console.
Example ipython session:
In [1]: from textx import metamodel_from_str
In [2]: mm = metamodel_from_str("""
...: Model: points+=Point;
...: Point: x=INT ',' y=INT ';';
...: """)
In [3]: model = mm.model_from_str("""
...: 34, 45; 56, 78; 88, 12;""")
In [4]: model.points
Out[4]:
[<textx:Point object at 0x7fdfb4cda828>,
<textx:Point object at 0x7fdfb4cdada0>,
<textx:Point object at 0x7fdfb4cdacf8>]
In [5]: model.points[1].x
Out[5]: 56
In [6]: model.points[1].y
Out[6]: 78
Xtext is Java based and works as generator thus it is not possible, as far as we know, to experiment in this way.
Post-processing
textX provide model objects post processing by registering a Python callable that will receive object as it is constructed. Post-processing is used for all sorts of things, from model semantic validation to model augmentation.
An approach to augment model after loading in Xtext is given here.
Parser control
In textX several aspect of parsing can be controlled:
- Whitespaces
- Case sensitivity
- Keyword handling
These settings are altered during meta-model construction. Whitespaces can be further controlled on a per-rule basis.
Xtext enable hidden terminal symbols which can be used for whitespace handling. Case sensitivity can be altered for parser rules but not for lexer rules.
Mapping to host language types
textX will dynamically create ordinary Python classes from the grammar rules. You can register your own classes during meta-model construction which will be used instead. Thus, it is easy to provide your domain model in the form of Python classes.
Xtext is based on ECore model, thus all concepts will be instances of ECore classes. Additionally, there is an API which can be used to dynamically build JVM types from the DSL concepts providing tight integration with JVM.
Built-in objects
In textX you can provide objects that will be available to every model. It is used to provide, e.g. built-in types of the language. For more details see built-in objects section in the docs.
An approach to augment model after loading in Xtext is given here.
Additional languages
Xtext use two additional DSLs:
- Xbase - a general expression language
- Xtend - a modern Java dialect which can be used in various places in the Xtext framework
textX uses RREL for the declarative specification of reference resolving in the grammar.
Template engines
textX doesn't impose a particular template engine to be used for code generation. Although we use Jinja2 in some of the examples, there is nothing in textX that is Jinja2 specific. You can use any template engine you like.
Xtext provide it's own template language as a part of Xtend DSL. This language nicely integrates in the overall platform.
IDE integration
Xtext is integrated in Eclipse and InteliJ IDEs and generates full language-specific tool-chain from the grammar description and additional specifications.
textX does not provide IDE integrations. There is textx-tools project which provide pluggable platform for developing textX languages and generators with project scaffolding. Integration for popular code editors is planned. There is some basic support for vim and emacs at the moment. There is a support for visualization of grammars (meta-models) and models but the model visualization is generic, i.e. it will show you the object graph of your model objects. We plan to develop language-specific model visualization support.
License
See here.
Frequently Asked Questions
Your question is not here? Please use
stackoverflow. Just make
sure your question is tagged with textx.
Is TextX suitable to generate Django model code ?
Yes, textX is perfectly suitable for the task. Actually, that is something it is created for. To make a clean little language that fits your needs in describing your requirements/solution and than generate a bunch of stuff for various target platforms. See the Entity example is the docs. It's very simplistic but would provide you a good starting point.
I see the success of Django and similar frameworks (like ROR for example) mainly due to use of internal DSLs (django models is a DSL that is interpreted on-the-fly to provide ORM etc., or admin is interpreted on the fly to provide CRUDS interface). With textX you can go further by having an external DSL where you can fully control your syntax and you can generate the rest of the stuff. Down the road, if you decide to leave Django, just change your generators and regenerate for the new platform.
Taken from #121.
What is an idiomatic way to test models generated by a grammar ?
Exact comparison of models is probably not a good idea : differences in the model may be unsignificant from the semantic point of view.
A more practical and sensible approach is to construct the model using textX and then to traverse the model, asserting various facts about it, duck typing style.
You may want to look at property-oriented testing, with frameworks as hypothesis.
Inspired by #116.
How to parse whitespace sensitive grammar (like Python) ?
There is no direct support for whitespace sensitive languages at the moment. An incoming work is going to deal with this.
Taken from #44.
How to use line terminator as EOL token (like Python) ?
You can disable whitespace skipping using ws parser
parameter to
redefine whitespaces or disable whitespace entirely using skipws param.
You can also do that per
rule. This way you can
catch whitespaces in your grammar. For your particular case, when you should
match inside single line only, there is even simpler solution by using
eolterm repetition
modifier.
See for example implementation of pyFlies conditions. In this DSL each state is a separate line.
Taken from #44.
TextX allows to get AST from code. How to convert the AST back to code ?
This feature is not implemented for the moment. It will be made possible by an incoming frontend for TextX based on another parsing method.
For the moment, the closest thing you have is the Entity example showing how to generate source code from models.
Taken from #36.
Is the .dot output fully deterministic ?
No, because internally the id() function is used when generating the .dot
output for nodes identification.
Taken from #101.
How is using a model processor is different from simply calling a function taking a model after the parsing is complete ?
No difference. Model processor is only a convenience that ensures that calling a processor is not forgotten.
Taken from #124.
Are object processors also called after the parsing is complete ?
Object processors are called after parsing and reference resolution. Thus, an object processor always have all references resolved.
Taken from #124.
If an object processor returns a value of another object type, does a processor for that type is called ?
If you return a value in an object processor, the current object is replaced. The replaced object is not further processed.
Taken from #124.
Is there an existing DSL for JSON schema ?
We are not aware of any project using textX for JSON Schema implementation.
It however shouldn't be hard to define grammar for JSON Schema in textX. You can start with the JSON example. Actually, JSON schema is JSON file so it can be parsed with any JSON parser (the official python one, or even textX JSON example) and validated and analysed afterwards. You could then extract schema validation rules and apply them to subsequent JSON files. JSON schema is meta-language, thus it could be applied to itself.
However, there are standard JSON Schema implementations in Python that do that well and probably will parse much faster than textX.
TextX targets situation where you want to parse something that doesn't have readily available parser, like some custom textual formats or DSLs. For example, to combine JSON Schema with other formalisms.
Taken from #51.
What's new in textX 1.5
It's been quite a while since the last release of textX so this release brings a lot of new features and fixes.
Operator precedence change
Probably the most important/visible change is the change in the operator precendence. In the previous version, sequence had lower precedence than ordered choice which is counter-intuitive to the users that had previous experience with other tools where this is not the case.
Ordered choice is now of lowest precedence which brings some backward compatibility that should be addressed for migration to the new version.
For example, previously you would write:
Rule:
('a' 'b') | ('c' 'd')
;
To match either a b or c d.
Now you can drop parentheses as the precedence of sequence is higher:
Rule:
'a' 'b' | 'c' 'd'
;
For the previous case there would be no problem in upgrade to 1.5 even if the grammar is not changed. But consider this:
Rule:
'a' 'b' | 'c' 'd'
;
In the previous version this would match a, than b or c, and then d as
the | operator was of higher precedence than sequence.
For your grammar to match the same language you must now write:
Rule:
'a' ('b' | 'c') 'd'
;
Unordered groups
There is often a need to specify several matches that should occur in an arbitrary order.
Read more here
Match filters
Match rules always return Python strings. Built-in rules return proper Python types. In order to change what is returned by match rules you can now register python callables that can additionally process returned strings.
Read more here
Multiple assignments to the same attribute
textX had support for multiple assignments but it wasn't complete. When multiple assignment is detected, in the previous version, textX will decide that the multiplicity of the attribute is many but this lead to the problem if there is no way for parser to collect more than one value even if there is multiple assignments. For example, if all assignments belong to a different ordered choice alternative (see issue #33).
In this version textX will correctly identify such cases.
Read more here
Model API
There is now a set of handful functions for model querying.
Read more here.
Additional special model attributes
In addition to _tx_position there is now _tx_position_end attribute on each
model object which has the value of the end of the match in the input stream.
In addition there is now _tx_metamodel attribute on the model which enables
easy access to the language meta-model.
Read more about it here.
textX Emacs mode
textX now has a support for Emacs. This package is also available in MELPA.